

By David Square
Does your cottage require a pet fish? Of course it does. Manitoba has nearly 100 species of freshwater fish, representing 19 families. As we are blessed with such an abundance of these colourful darting fauna, you should consider building a DIY fish of your own which can be used to hang jackets, caps, swim suits, keys and many other essential items.
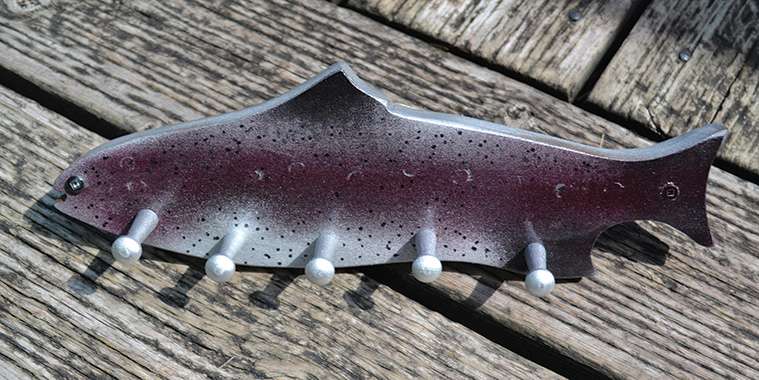
While scrutinizing a copy of The Freshwater Fishes of Manitoba recently, I was struck by a picture of a rainbow trout which revealed the animal’s simple yet singular beauty. Rainbows are characterized by red or purple stripes on each side of the body, which run forward onto the gill cover. Most of the silver body is covered with black dots, including the dark dorsal fin and tail.
This stocked trout species is one of Manitoba’s most sought after fish and is found in cold brooks, deep lakes and manmade pits throughout the province. (Check your 2019 Angler’s Guide for limits.)
Materials required:
• One pc. 5” x 13” x 5/8” clear cedar
• Silver, black and red/purple spray paint, black marker
• One each #8 round head and #6 flat head Robertson screws by 1 ¼” long
• Five pcs. 1 3/4” x ¼” Shaker pegs
Tools:
• Jigsaw or bandsaw
• Drill and bits
• Drum sanders, orbital palm sander, sanding block
To begin, find a photo of your favourite Manitoba fish on the Internet or get a copy of The Freshwater Fishes of Manitoba.
Use graph paper to lay out your fish of choice. I included only the prominent dorsal, tail and anal fins because the smaller pectoral and pelvic ones would have been covered up by Shaker pegs. For this project, it is sufficient to define the species by its body, the major fins, eye placement and shape of the mouth. The markings on each individual fish are the definitive clue to its identity.
Trace your drawing onto the cedar board and cut it out with a jig or bandsaw. Remove the kerf marks with drum sanders which fit the curves as snugly as possible. The front and back can be smoothed with #120 paper, using an orbital palm sander or sanding block.
Drill a 3/16” eye hole and a 1/8” hole in the tail fin to receive #8 round head and #6 flat head Robertson screws, respectively. Countersink the tail hole so the screw’s head will be flush with the wood.
Drill five ¼” holes spaced evenly along the fish’s belly to receive the five Shaker pins. (If you own a lathe, you can turn these. If not, you can purchase them from Lee Valley for about 25 cents apiece.)
To seal the wood and establish a base colour, spray your fish with (in this case) silver paint available from craft stores like Michaels. Apply two coats, leaving eight hours drying time between them; at the same time, paint the Shaker pegs.
Next, spray a line of purple or red paint down the centre of the body, moving from the midpoint of the tail to the beginning of the gill cover. Carefully paint the entire gill cover, being cautious to avoid overspray from falling on the silver body. Use black spray to paint the major fins.
Cover the #8 round head screw with black and silver paint to create an eye, using black paint only on the countersunk #6 tail screw. The screws will secure your dazzling trout to a wall or other appropriate location.
Finally, create the dots that cover most of the fish’s body with a fine point black marking pen and glue the Shaker pegs into the previously drilled holes.
To seal the paint and add lustre, brush on three to four coats of gloss Minwax Polyurethane to the front, back and sides of your DIY treasure. Before applying the final coat, rub out the previous one with #400 wet/dry paper to ensure a silky-smooth finished surface.
When your work of art is mounted, you will never need to angle for your important stuff again. But you will be free (no searching for boat keys) to fish for any of Manitoba’s aquatic wonders and regale friends with fishy tales.