

What do trout lures and humbuckers have in common? Well, if you are refurbishing an electric guitar, they may both prove essential for good looks and good sound.
In Part Three of this article, I will show how to wire humbuckers (pickups) to a prewired harness purchased online from Amazon.ca. The humbuckers were $24 each and the harness $16, including a three-way switch and two potentiometers or pots to control volume and tone.
Unless you are an electrician capable of wiring a custom harness that has individual components, I suggest you buy a prewired one to save time and confusion. (Check out StewMac’s Internet site in the US or Long & McQuade’s in Canada for a lot of useful info about electric and acoustic guitars.)
Humbuckers are rated at 500k (resistance measure) and have two coils which brighten a guitar’s sound and reduce the hum associated with electrical interference. They are the pickups of choice for people who enjoy playing loud, clean rock music. Be sure that your pre-wired harness has matching 500k pots (not 250k) so it is compatible with the pickups.
My pickups and harness arrived from Amazon without a diagram showing how to solder the humbuckers to the three-way switch and common ground. After perusing 100-plus guitar wiring schematics on the Internet, it finally became apparent to me that only Elmer Fudd would fail to immediately grasp the simplicity of the wiring.
Attached to the back of the volume pot was a common ground (black) wire to which the braided grounds from the pots were to be soldered. A white wire from the neck humbucker was to be attached to an open lug terminal on the switch, identified by a tiny dot of white paint; ditto for a red wire that lead from the bridge humbucker. (My excuse for overlooking the obvious is that I had misplaced my reading glasses at the time.)
All of my excessive searching did result in this knowledge: For wiring pots and switches, a small 25-watt soldering iron/gun is preferable because it will not overheat and damage the delicate components; a 50-watt is suitable for thick braided wires.
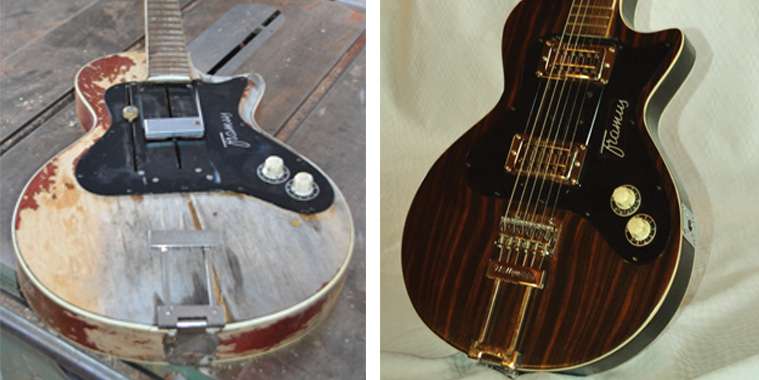
Trout lures tend to be overlooked as replacement parts for refurbishing guitars. In my case, I devoted several hours perusing the Internet to locate a truss rod cover-plate to replace the original Framus one, lost, along with the bridge and machine tuning heads, during the guitar’s long exile in a leaky shed. (I’ve told this sordid story in Parts One and Two. If you would like a recap, go to the April 5 and May 3 editions of The Winnipeg Real Estate News) Anyway, after countless unfruitful attempts to a find a replacement plate, I was going through my fishing gear to prepare for the upcoming angling season, when a shiny, silver trout lure caught my eye. I removed the jump rings that held the hook and leader in position and then used a hacksaw to cut the lure in half horizontally. The result was half elliptical-shaped piece of bright metal with a base not only wide enough to span the length of the nut (the plastic piece between the neck and the head with notches to hold the strings in position), but it was tall enough to cover the truss-rod hole in the guitar’s head.
An added bonus was the pre-drilled hole where the jump rings for the leader had been attached to the lure. I drove a chrome-plated screw through the hole and into the head to hold the spectacular new cover plate in place.
Before I wrap up this article, I have a few suggestions as to what not to buy to refurbish a guitar. First, do not invest in a cheap hard-tail bridge. Though this gizmo can be adjusted for intonation and action, it looks like a pair of braces and requires an Allen wrench and a screwdriver to set up. Mine is an inexpensive knock off of a Fender hard tail and no matter how many adjustments I make, I cannot stop the G-string from buzzing (no reflection on my playing). A Long & McQuade salesman suggested I purchase a tune-o-matic bridge by Gibson, which can be adjusted by turning thumb screws either side of the bridge to raise or lower the action and flat-head screws at the back for intonation. Also, do not buy cheap machine screws. The knock offs are known to slip, possibly causing the guitar to go out of tune when you are playing an awesome lead axe solo. Finally, estimate the time it will take to refurbish your guitar and multiply by ten.
Have fun and “Keep on rockin’ in the free world.”