

When I was a cub reporter at the Winnipeg Free Press, the first story I wrote came back from the editor’s desk with the words “less Shakespeare, more KISS” scribbled in blue pencil across the first page. I was not familiar with the term KISS and asked a more seasoned reporter what it meant. It’s an acronym for “Keep It Simple Stupid,” he said.
Interesting — to me at least — is the fact that I was the recipient of a similar criticism from a woodworking instructor while attending the John Makepeace School for Fine Woodworking in Dorset, England. We students had been assigned the task of building a chair out of a limited number of sycamore (maple) boards. I decided my completed chair was too plain and required ornamentation, so I painstakingly carved some lovely rosettes on the rails, back, legs and many other places. My instructor’s comment was “less baroque, more Le Corbusier,” meaning “less is more” or “Keep It Simple Stupid.”
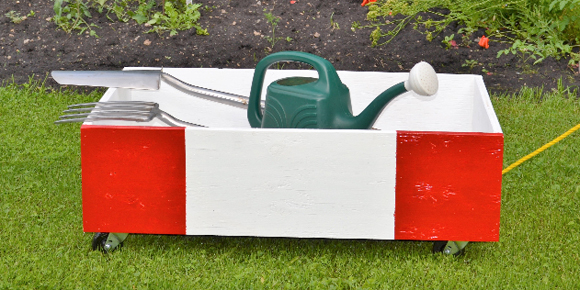
With KISS in mind, I recently designed a garden wagon so simple that I experienced an attack of narcolepsy (KISS: fell asleep) while constructing it. My only concessions to overdesign were to make the bottom a Golden Rectangle and to add a simple, patriotic paint job to the finished product. (It was July 1, after all.)
A Golden Rectangle has a ratio of about 1:1.6. The ratio has been used by artists and architects either consciously or unconsciously for millennia because the shape is considered to be one of the most visually satisfying of all geometric forms. The front elevation of the Parthenon at Athens, for example, fits into a Golden Rectangle almost precisely; paintings by masters such as da Vinci, Seurat and Mondrian all contain rectangles constructed with the captivating ratio of exactly 1:1.618.
To construct a garden wagon similar to the one pictured above, you will need a saw, screwdriver, drill, tape measure, half-inch and 5/8-inch exterior grade plywood, screws, bolts, paint and rope, as well as four three-inch swivel castors.
1. Cut the bottom from 5/8-inch plywood with dimensions of 22-inches wide by 38 1/2-inches long to obtain a Golden Rectangle. If you make the bottom, say, 24-inches wide, calculate the ratio by multiplying 24 by 1.618. The result should be 38 7/8-inches long by 24-inches wide.
If you failed high school math like me, the Internet has a Golden Rectangle calculator that will do the math for you.
2. To keep the weight of your wagon manageable, cut the sides and ends from half-inch plywood. The sides on my wagon are 10-inches high to make optimum use of the scrap ply I had in my workshop. Cut both sides one-inch longer than the bottom so they overlap the half-inch thick end pieces.
3. Attach the sides and ends to the edges of the 5/8-inch bottom with No. 8 by two-inch screws every six inches. As half-inch ply does not leave much room for error, screw the corners together using one-inch-by-one-inch battens ripped from scrap spruce lumber. (I skipped the battens as my cart is built entirely out of three-quarter-inch material.)
4. Flip the cart over, mark the position of your castors on the bottom and drill holes for the 3/16-inch-by-one-inch bolts that hold each castor firmly in place. Use washers on the inside of the cart to prevent the nuts from cutting into the 5/8-inch plywood bottom.
5. Drill a 3/8-inch OC hole in the front end of the cart about one-inch above the bottom. Thread a suitable length of 3/8-inch thick poly rope through the hole, tying a sizeable knot inside the cart to prevent the rope from slipping out of the hole while you are showing off your beautiful new garden wagon to neighbours.
6. Painting your creation is not mandatory, however, a couple of coats of outdoor acrylic paint will prolong its life. If you dare to push the boundaries of KISS, you might add a second colour that suggests a patriotic symbol or whatever gets you through the night. Just don’t paint your cart like one of those gawd awful Volkswagen buses from the ’60s and ’70s.
Final suggestion: KISS.