

Grass (not the medical variety) requires constant cutting this time of year. This means your lawn mower or garden tractor must be in tip-top condition to meet the constant demand of hacking down whatever green matter comprises your yard.
Most mowers accomplish this by sheer force, because their blades are dull and pitted due to the operator’s uncanny ability to roll over hidden stones, not-so-hidden small branches and other debris that he/she is too lazy to pick up. (I include myself in this description.)
Tip 1: Drain the gas from your mower before removing the blade(s) by tipping the machine on its side. Liberal applications of WD-40 or some other penetrating oil may be required before the bolt(s) that hold the blade can be loosened with a half-inch or 9/16-inch wrench. For garden tractors, jack up one side at a time to remove the blades or unfasten the deck and slide it from under the machine.
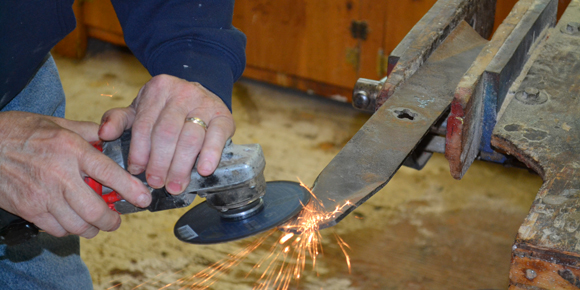
Tip 2: Unless they are bent, most blades can be re-sharpened with a bench or angle grinder and a file. I prefer an angle grinder with a metal cutting wheel because it removes metal quickly without burning the steel and ruining the temper.
Put on goggles and a mask before placing the blade in a vise or lag bolting it securely to a solid surface.
Begin sharpening by running the angle grinder’s disc gently along the bevelled edges of the blade. Continue at both ends until the cutting bevels are sharp. Remove burrs from both sides of each bevel with a few strokes of a fine file. Some diligent folks will balance the blade by hanging it from a ceiling by a string attached to the centre hole and continue to remove metal until the blade hangs horizontally. If you are obsessive/compulsive like my brother-in-law, this could be your thing.
However, after 30-plus years of sharpening blades, I haven’t balanced a single one. I opine that mowers are oblivious to a 0.05 gram difference in the weight of one bevel compared to the other.
Tip 3: Before re-attaching your blade(s), clean out all the crud that has accumulated under your machine’s deck with a sharp stick or a friend’s chisel. The benefits are manifold, including lower gas usage because the blade turns freely, less weight for you to push (wet grass is a drag) and fewer sharpenings because crud attracts crudier crud that dulls the fine hone on your blade(s).
Tip 4: Starting a mower after a winter layoff can be almost as dangerous as spraying a hibernating bear with a garden hose. This is because mowers, like bears, become grumpy at the thought of yet another long season of thankless toil ahead. If you have left your mower outdoors and uncovered from November thru May, it will be very grumpy, so grumpy in fact that it might refuse to start. (Would you leave a pet outdoors and unsheltered for an entire winter?)
If you are guilty of such indifference, do something kind for your machine like changing the oil, replacing the air filter and adding fresh gas containing a bracing 1 1/2-ounce shot of Sea Foam or other fuel stabilizer. Changing the spark plug, fixing corroded high tension wires and oiling cables and other moving parts will also go a long way toward soothing your mower’s hurt feelings.
Tip 5: Now that your machine feels loved and wanted, it may start with a single pull of the rope or twist of the ignition key. If not, yanking the rope until it breaks or cranking the motor until the battery dies are not useful methods for starting an abused engine. It’s possible the carburetor contains moisture, preventing you from coaxing that first sput-sput-sputter of life from your mower.
Keep calm. You’ve lavished a lot of TLC on your engine, but it’s still miffed at you.
Tip 6: Remain buoyed by the thought that flushing the carb is not a big deal. On most small gas motors, the carb is located under the air filter and held in place by a couple of bolts. With the air filter removed, the throat of the carb will be visible.
New engines normally don’t have a circular butterfly valve choke. If yours does, open the valve by pushing lightly downward on one edge with a screwdriver. Spray commercial carburetor cleaner into the throat, cranking the engine a few times so the liquid is sucked into all areas of the fuel system, removing moisture and dirt from the bowl, jets and other requisite mechanisms.
Replace the air filter and re-crank the engine. If it does not start after three or four pulls, retire to your hammock and consider other options. Kicking things won’t help.
Tip 7: Before you unbolt the carb and attempt to install a carb kit, unscrew the new spark plug you put in earlier and hold the upper hexagonal piece against a non-rusty part of the motor. Wearing a heavy pair of non-conductive rubber gloves, attach the high tension wire to the plug and ask a helper to crank the engine. A spark should be discernible between the central electrode (little dot of metal) and the side electrode (L-shaped piece of metal).
If a spark appears, your electrical system is A-okay. If a spark is not visible after several cranks, it’s time to return to your hammock to consider the purchase of a flywheel puller.
Tip 8: There are a lot of hillbilly ways to remove a flywheel, most of which will damage the fins or crack the wheel. In my opinion, the least expensive and safest technique is to borrow a flywheel puller from a friend or acquire a cheap one from a discount auto store.
With this gizmo in hand, you are ready to perform major surgery on your vengeful engine. Remove the cowling and unscrew the coarse screen that hides the flywheel from view. You will see a threaded, tapered shaft with a bolt that holds the wheel in place. To loosen the bolt, place a stick between the mower’s blade and the underside of the housing to prevent the shaft from moving. Sometimes a ratchet with a cheater bar is required to unloosen this factory-torqued bolt.
With the bolt removed, place the centre leg of your wheel puller in the dimple located in the middle of the flywheel shaft. Hook the puller’s two (some have three) legs to the underside of the wheel and then tighten the bolt at the top of the puller’s centre leg until the wheel pops off the shaft.
Tip 9: Underneath the flywheel you will see a number of electrical components. The main culprit is a solid-state ignition armature. The armature is easy to locate because it is the only part mounted adjacent to the flywheel and held in position by two bolts. Remove the offender and have it tested at a repair shop. A new armature should come with a thin plastic spacer to ensure the armature is the correct distance from the flywheel when re-bolted into position.
Replace the flywheel, screen and cowling before cranking your machine. If it doesn’t start, refer to Tip 10.
Tip 10: DIYers with steady hands and excellent vision are capable of installing a carb kit. (For my part, I pay a professional to do the job.) At this point, given all the sweat and tears and money you have poured into your machine, there is no reason for the wretch not to start.
However, if it doesn’t, you now have the moral high ground and the right to dispose of the ingrate as you see fit: Fishing anchors and lawn ornaments are popular on Kijiji.
Moral: The person who buys a shed will be forever at peace with his machinery.