

by Paul Bianchina
If you’d like to improve your outdoor living space but desire an alternative to a wood deck or a boring concrete-slab patio, look no further than concrete pavers (paving stones). Beautiful, durable, and available in a wide range of colours and patterns, pavers can give you whatever look you’re after.
You can create a simple square patio or an intricate showpiece in complex curves. Walkways, eating areas, play areas and a spot for that shiny new gas grill are all possible with these versatile paving stones. And with a little work, they’re also a great do-it-yourself project that will add not only bring satisfaction and outdoor enjoyment, but also add resale value to your home.
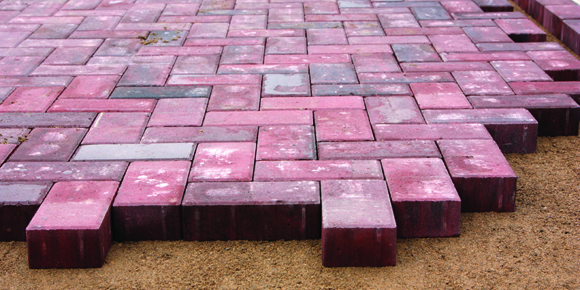
At your local home centre, lumberyard or other retailer of paving stone products, you'll be able to get a look at the many different stones available. They range from uniform squares and rectangles to ones that appear to have a more random flagstone appearance.
Look at the different displays and brochures available and you’ll also see how the stones can be mixed and matched in different configurations to create patterns. Even those seemingly random flagstones actually fit together in a pattern.
There are also lots of colours available, especially in the earth tones. You can stick with a single colour or you can blend complementary tones. If you want, you can also use contrasting colours to create a pattern within a pattern, such as a big sundial in the middle of the patio. It’s all up to your imagination!
Once you've made your decision, the dealer can help you determine the number of pavers needed for your specific area and the pattern you’ve selected, and will arrange delivery to your site.
Layout and preparation
Next comes the actual layout. Mark the layout directly on the ground using spray paint, then remove any grass or other landscaping as needed, and rake the soil to remove rocks and debris. Using a long, straight board and a level, or better yet, a laser level, which can be rented, and begin rough-grading the soil.
For drainage, paver installations should slope a minimum of 1 1/2 inches or more every 10 feet. Use a gas-powered flat plate compactor, which can also be rented, to compact the soil.
Next comes a layer of approximately four inches of paver base rock material or 3/4 “minus” gravel, which is available from wherever you buy your pavers, or from any retailer of landscaping supplies. Level the gravel and then compact it.
Next comes the sand base, which needs to be one inch thick. To simplify measuring this thickness, make some guides from long pieces of one-inch plastic pipe. Simply lay the pipe down on the compacted gravel, pour on the sand, and then smooth and level the sand by running a straight board along the tops of your pipes. Remove the pipes, fill in the remaining areas and mist the sand with water to settle it in.
Install the pavers
Start up against the house in order to give yourself a straight starting point. Lay full pavers on the sand base in the pattern you’ve predetermined. Use a long level to make sure the pavers are level. If they’re high, tap them down with a rubber mallet. If they’re low, add some paver sand under them and then tap them down. Continue laying out full pavers until you have all of them installed, making certain that you carefully follow your pattern design.
Where you need to cut pavers, use a diamond-bladed wet saw, which you can get from any rental yard. Mark the cut lines with a masonry crayon and cut along the line with the wet saw. Be sure you’re wearing hand, ear and eye protection while cutting, as well as a dust mask.
At the outside edges, away from the house, secure the pavers with a flexible plastic retaining edge. Simply place the edge firmly up against the pavers so that the top of the retaining edge is below the pavers, and then secure the retainer in place with spikes driven into the ground.
When all the pavers are installed, compact them with the plate compactor until they are uniformly level and are at the desired grade. Spread a final layer of coarse dry sand over the top of the pavers and work the sand into the cracks with a push broom.
Spray the installation with a light mist of water to help settle the sand, and then repeat with additional sand after the installation has had a couple of days to settle.
— Inman News.