

In part two of this three-part series, I will show how to re-veneer the body of an electric guitar, in this case, a hollow-body Framus built in Germany in 1961.
I recently retrieved the guitar from a leaky shed located on the back forty of my property, where it had been carelessly stored by me for about 40 years.
As a result of exposure to rain and snow melt, the maple veneer was peeling off the front and back of the guitar’s body. I removed most of the veneer with a putty knife. In a few areas where it remained firmly attached, I used a hair dryer to melt the hide glue that adhered the maple sheets to the body.
Underneath the veneer, there was a Baltic birch substrate which formed the top and bottom (plates) of the instrument; the sides where constructed of solid 5/8-inch-thick birch.
Astonishingly, the purfling and binding that decorate and protect the wood edges of a guitar remained in decent but not perfect condition, presenting me with a dilemma. Should I replace the flexible plastic purfling and binding, or should I leave it in place?
The replacement option required me to spend $40-plus on a rabbeting router bit (see Lee Valley online) capable of cutting two separate depths and widths to receive the smaller purfling and the larger binding. I also needed to locate a source of both trims. An Internet query revealed that Long & McQuade in Winnipeg and Stew Mac in the US sell a variety of wood and plastic trims for about $4 CDN per 65-inch length of purfling and $6.50 CDN per 65-inch length of binding. I decided the replacement plan was a possibility.
The second option presented a nasty technical problem as the edge trims stood proud of the guitar’s top and bottom plates by the thickness of the removed veneer. This meant I had to make paper templates that exactly replicated the inside edges of the curved trims, and then trace the templates onto sheets of veneer. The veneer then had to be cut out perfectly to correspond to the meandering lines of the templates, a tedious job with little chance of success. I rejected this idea outright.
My compromise solution was to sand the trims flush with the bottom and top plates. I used an orbital sander with #120 discs and, in tight places, a cabinet scraper to complete this job. The technique created a flat top and bottom that were easy to re-veneer and left most of the trim still visible when I feathered back the veneer around the guitar’s edges.
I do not suggest using hot hide glue to veneer because the adhesive is messy, has poor tack, stinks (especially when over heated) and requires your wife’s double boiler and candy thermometer to maintain an optimum working temperature of 140-degrees F. Another option is to purchase (as I did) a $150 electric glue pot which automatically maintains the optimum temperature. I used my electric pot exactly once, when I tried to lay some gorgeous bird’s-eye maple veneer on top of a pine substrate. All I can say is that veneering with hot hide glue is like to trying to put out a grass fire: as soon as you think you have stomped out the burning grass, the fire reignites behind you; similarly, once you think you have firmly adhered a sheet of veneer to a substrate, the sheet comes unstuck behind you. This hilarious game can go on for hours. Advice: never use hot hide glue or pre-mixed cold formulations of the stuff for anything — preserve your sanity.
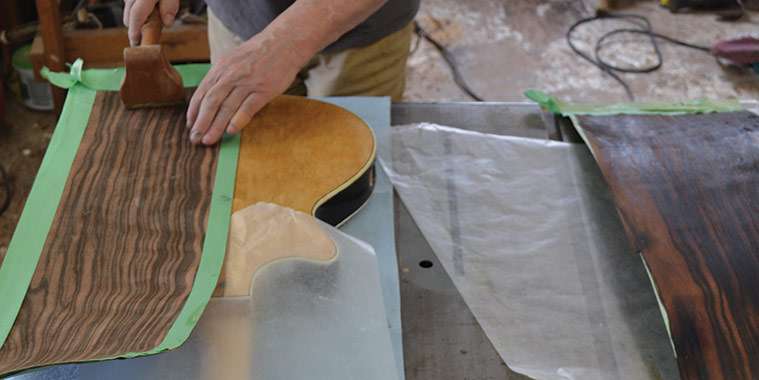
I chose book-matched (mirror images of each other) sheets of macassar ebony veneer for the front and back plates as the wood is considered one of the most beautiful in the world. The figure is composed of parallel stripes ranging in colour from tan and brown to walnut and black.
My veneer was stored in my shop for several years, and, as a result, it was dry and prone to splitting along the grain. To eliminate this problem, I wrapped masking tape around each end of the four sheets. Before cutting the book-matched edges of the long grain with a box knife, I stabilized them with a single length of masking tape applied to the upward face of the veneer. I then drew a pencil line down the mid section of the instrument as a centre alignment mark when applying the veneer.
In my opinion, the best adhesive for small veneering jobs is contact cement. It can be applied with a brush and is ready to use after a short drying time. I applied a heavy coat to the back of the guitar as well as the backs of two book-matched sheets of veneer. When the adhesive lost its gloss (about 20 minutes), I prepared to apply the first sheet by covering most of the adhesive on the body with wax paper, leaving a small open area at the bottom edge from which to begin laying the veneer.
As contact cement forms an extremely strong initial bond, it is necessary to slowly press the veneer into position with a brayer or veneer hammer, pulling the wax paper from between the substrate and veneer a few inches at a time as you work, while keeping the veneer’s joining edge in alignment with the pencil mark. I left a generous overhang around the guitar’s body which I later removed with a router trim bit.
In part three, I will show how to install pickups and a wiring harness in a guitar.