

With the Holiday Season approaching, it is timely to illustrate how DIYers can create one-of-a-kind Christmas ornaments and figurines to decorate their homes or to gift to family and friends.
The tools and materials required include:
• Lathe
• Roughing gouge
• Ball turning gouge
• Drill and bits
• Hardwood scraps
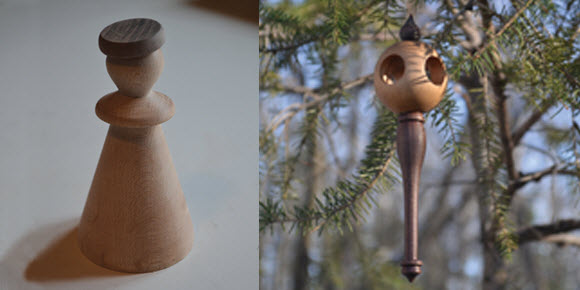
I turned an angel figurine from a two-inch-square by four-inch-long blank of hard maple, also known as sugar or rock maple.
I began by using my roughing gouge to create a 1 3/4-inch diameter maple cylinder. Because they are designed to remove a lot of wood quickly, roughing gouges are heavy chisels that are ground with a flat cutting profile at the tip to prevent breakage during service.
Ball gouges, on the other hand, resemble a long, pointed fingernail that is sharp at the tip and on the two outside edges. This shape allows the lathe operator to create narrow cove cuts with the chisel’s tip. as well as enlarge the coves by rotating the chisel so its sharp outer edges cleanly shear away excess wood.
I placed my maple cylinder between a live point on the lathe’s tailstock and a spring-loaded centre point with steel gripping teeth (Sorby Stebcenter) on the machine’s head stock.
I secured the end of the cylinder, which would form the figurine’s head to the live point, because it is nearly impossible (even for me) to nick a chisel on a smooth, cylindrical piece of steel, as opposed to metal teeth.
Before I began to shape the angel’s head, I used my ball gouge’s tip to cut shallow slits in the blank as guide points to mark the one-inch-long oval head, the three-eighths-inch disc that represents the figurine’s arms and two-inch-long cone of the body.
Needless to say (but I’ll say it anyway), sharp chisels make for a happy turning experience. After experimenting with all kinds of sharpening gizmos, I settled on an adjustable grinder tool rest from Lee Valley and an 80x Norton cool grinding wheel. With slight adjustments to the rest, I can free hand most turning tools with a few passes on the soft wheel, designed to prevent bluing the steel by overheating and removing the metal’s temper.
I roughly shaped the angel’s head using the ball gouge’s tip and then refined the head’s shape with shaving cuts made with the chisel’s sharp edges; ditto for the disc that represents the figurine’s arms. I formed the conical base by quickly removing the bulk of the wood with the gouge’s tip, smoothing the final form with one of the tool’s sharp edges, working from the wide bottom upward toward the arms.
I turned the three-16th-inch-thick halo from a scrap of black walnut, also employing the versatile ball chisel for this job.
After sanding the figure on the lathe with No. 220, No. 320 and No. 600 paper, I removed it and used a belt sander, held upside down and stationary in my woodworker’s vise, to create a slightly skewed flat area on the angel’s head onto which I glued the walnut halo.
Tung oil applied in several coats and sanded between with No. 1200 paper and finally buffed with a soft cloth produced a lustrous finish on my figurine.
A slightly more challenging project is to turn a Christmas ornament with an icicle finial.
The tools for this are the same as for the angel, however, purchasing a collet chuck for the lathe’s head stock will reduce much of the anxiety associated with turning slender finials, as the collet firmly supports the turning blank.
I created the ball for this ornament by drilling five-eighths-inch holes through both sides of a two-inch maple cube to which I drilled a hole for a quarter-inch dowel that extended about a half-inch from one end of the cube. I glued the dowel in place and then inserted it into a quarter-inch collet attached to my lathe’s head stock.
I found that the trick to turning a ball from stock that has been pierced with holes either side was to remove the cube’s corners first, followed by light passes over the drilled centre section to prevent tear out and to limit the amount of wood removed. Because of the holes, there is less wood in the centre of the turning and, therefore, too much pressure on the chisel will rapidly reduce the ball into a shape that resembles an apple core.
I turned the black walnut finial using the ball chisel and a five-eighths-inch by four-inch-long blank held in place by the same collet and live point used to create the ornament’s ball.
As the walnut got thinner, I employed my left hand to support the finial as I carefully shaved away excess wood. (In my experience, it is not advisable to turn very fine spindles out of softwoods like pines, because they do not have the requisite density/strength to hold together under the stress of turning.)
I turned the pointed round nub that is attached to the top of the ball from a scrap of walnut using the same techniques as above. The nub, which has a one-32nd-inch hole drilled through it to accommodate a hanging leader, is drilled on the underside to accept the quarter-inch dowel attached to the ball to facilitate its turning.
The finial icicle fits into a tapered hole I drilled with a countersink into the bottom of the ornament. Yellow glue holds the end of the finial firmly inside the taper.
Happy DIY gift-making for the holiday season.