

Installing a new chimney for a wood-burning stove can be accomplished by a DIYer in a wink of St. Nick’s eye.
The tools required are minimal as modern insulated stove pipe is sold in three or four foot lengths that lock together easily.
If you decide to install a chimney for a wood heater, the retailer will sell you a complete CSA-approved package for a standard pitch roof or a steep pitch cathedral one. Once you have decided where the stove will sit in the house, follow these steps to mount the chimney.
1. Locate the six-inch pipe collar, usually found on the top of new high-efficiency stoves.
2. From a step or extension ladder, drop a plumb bob from the ceiling or roof to the stove below; then move the string until the bob lines up with the centre of the pipe collar. If possible, mark a point between two trusses or joists. This may require adjusting the stove a few inches from its original spot, but it will eliminate the need for an elbow at the ceiling or roof.
3. A ceiling support box is required to carry the weight of the 10-inch diameter insulated chimney pipe that runs through the attic and above the roof line. Using the mark on the ceiling as a centre point, scribe a circle onto the ceiling to the dimension recommended by the manufacturer and cut it out with a reciprocating saw. From the attic, ease the support box into the circular hole, allowing the round base to protrude from the ceiling. In some cases, a metal box welded to the circular base is screwed or nailed to the floor joists or truss chords. As well, two cripples of similar dimension to the joists are nailed between the joists and chords.
4. Lower the first length of insulated pipe into the box, ensuring there are two-inches of clearance between the pipe and combustible material. Attach a stove pipe adaptor to the round base extending from the ceiling by inserting the adaptor into the base and twisting it to the right. It is now safe to continue adding pipe.
5. Determine where the insulated pipe will exit the roof by using a plumb bob as described earlier. Drive a screw through the centre mark so it will pierce the roof and be visible from above. Cripples are nailed between the rafters at this point as well.
6. Carry the chimney flashing onto the roof and center its circular hole over the screw. With a felt pen in hand, reach inside and mark a line on the roof around the circular interior of the flashing. Put it aside and then remove a small patch of roofing material (usually asphalt shingles) to reveal the substrate from which the screw protrudes. Drill a one-inch hole through the substrate and insert the blade of a reciprocal saw into it. From this center point, cut toward the edge of the marked circle and follow its circumference until the disc can be removed. Fit the upper side of the flashing under the shingles using a pry bar to remove roofing nails from under three rows of shingles. About half the width of the flashing should be under the shingles so continue to remove nails until the flat metal slides easily into place. Remove the flashing and coat the underside on all four sides with roofing cement; lay on a heavier coat on the edge that goes under the shingles. Use roofing nails to fasten the flashing to the roof on all four sides, lifting the shingles at the back edge so the nail heads are protected. Cover exposed nail heads with roofing tar. Go easy on the tar as it is usually black and can create an unsightly mess.
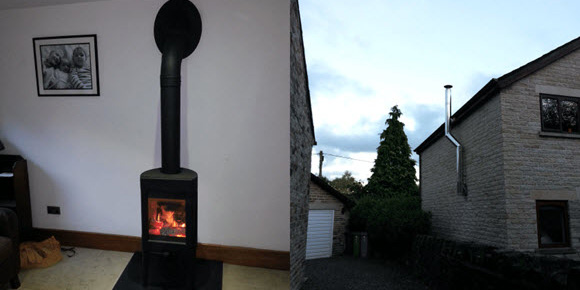
7. Continue to stack and lock lengths of insulated pipe until you have reached a height of three-feet above the downward side of the roof’s slope and two-feet on the upward side, within ten feet of the roof. This may sound complicated but a diagram supplied with the chimney makes it easy to understand. (You want to use the least amount of pipe to meet code as it retails for about $300 per three-foot length.)
8. Tighten the storm collar around the space where the chimney passes through the top edge of the flashing’s cone. Use silicone caulking to seal the joint between the collar and chimney, as well as the joint where the cone and flashing are attached. Place the rain cap on top of the chimney by twisting it to the right, locking it into position. In areas with high winds, a metal chimney brace and locking bands around the pipe joints are recommended. Also, if the chimney passes through upper and lower living spaces, a fire stop radiation shield must be installed around the pipe to protect the area between the floor and ceiling. Moreover, an attic insulation shield may be required to prevent insulation from touching the chimney. This shield can be purchased or hand built of wood as long as the two-inch space around the chimney is maintained.
9. To finish your chimney, connect double-wall stove pipe from the ceiling adaptor to the six-inch collar on your stove. Each joint is held together with high temperature sheet metal screws sold with the pipe. The chances of your pipe being exactly the correct length are slim so telescopic pipe and various adaptors are available to ensure a perfect fit.
10. Cathedral ceiling installations are basically the same. The exception is that a special roof support assembly is required to hold insulated pipe between the rafters.
A chimney with six feet of double-wall pipe and nine feet of insulated pipe costs about $1,200 plus $800 for accessories. Your insurance company may require a DIY installation to be inspected by a Wood Energy Transfer Technology (WETT) expert. Google WETT to find an inspector in your area.