

By David Square
If you’re planning on selling your home, consider building a DIY cedar garden bench to increase its marketing potential and add value.
In my January 24 column, (found here) I demonstrated how to assemble the legs and armrest of a cedar garden bench. In this column, I will complete the project by giving instructions on how to build the seat, backrest and, how to solidify the structure with decorative pieces of cedar that triangulate the bench.
Though mid-winter may seem a strange time to build garden furniture, it is the best time because DIYers have more free hours to spend in the workshop creating outdoor masterpieces. (The bench’s material list is included in the January 24 article.)
Directions:
Cut two pieces of 4”x4”x6’ cedar. Using a dado blade at 5 degrees, rip 1 1/2”x1 1/2” dadoes in each board. (The 5-degree rip will allow the bench’s 2”x4” seat members to sit flush with the front and back 4”x4”x6’ horizontal supports.)
Now, stand the leg and armrest supports on a level surface and temporarily attach the horizontal 4”x4”s to the front and back legs by drilling 2 pilot holes for #8x4” deck screws through the legs. Drive the screws through the legs into the ends of the beams. Some dickering will be required to ensure the beams are level and the bench is square. The removable screws will allow you to make the necessary adjustments. When you are satisfied, drill 1/2”x 3” deep holes into the beams’ end grain to receive the ½” hardwood plugs. Glue the plugs into the holes with waterproof adhesive and set them aside to dry. (The plugs will allow the lag bolts to get a firm purchase. Lags screwed directly into cedar end grain have no holding power.)
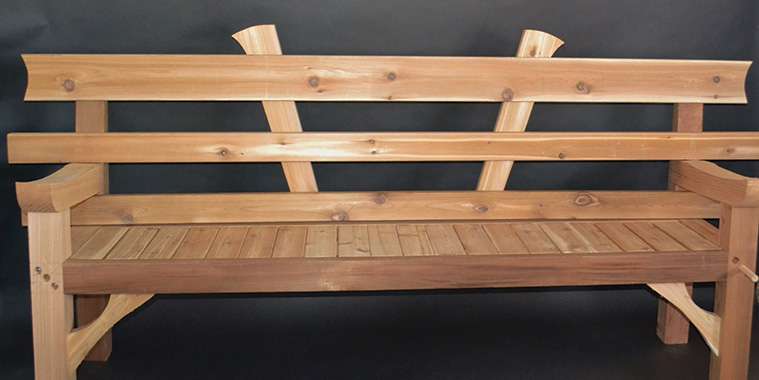
While the glue sets, cut 20 pieces of 2”x4”x14 1/2” cedar for the seat. The pieces run at a right angle to the back and front beams, sitting in the previously cut dadoes with a 5-degree backward slope. Use 1/8” nails as spacers. Attach the 2”x4”s by driving #8x3” deck screws at a slight angle through either end of each seat board. For a cleaner look, screw the pieces into position from the bench’s underside; no heads will be visible.
Place the bottom 2”x4” chord of the backrest about ¼” above the seat for drainage. The middle chord sits slightly above the armrest for the same reason.
Cut shallow arcs into either end of the 2”x6” top member: it is up to you to choose a pleasing shape. The middle and bottom 2”x4” pieces will also have arcs, and the boards will be slightly longer (middle) and slightly shorter (bottom) to add aesthetic appeal to the bench.
Make two 28” long by 5 ½” tapered vertical uprights with the tops rounded from the leftover of the 2”x6” material. Angle these pieces at 30 degrees in relation to the bench’s bottom edge, cutting them flush to it. Allow the rounded tops to protrude about 4” to 5” from the bench’s top chord. Screw the angled pieces into the horizontal back chord from behind to hide fastener heads.
Cut two pieces of 12” long scrap 2”x4”, adding a 45-degree angle to either end of each board. Use a jig or band saw to create arcs on the braces that echo the concave cuts on the 2”x6” top chord. Screw each brace flush to the front legs and flush to the underside of the main horizontal beam. (The braces are set back about 1” so they do not interfere with a person’s leg; they stiffen the bench by preventing lateral movement during service.)
Finally, plug the ¾” holes to hide the lag bolt heads. (As ¾” button plugs are very expensive, you can turn something similar on a lathe. Mine are what might be called short Morse tapers, starting at 1” round and tapering to 5/8” round. The 5/8” ends are coated with waterproof glue and tapped into a ¾” hole until they seat tightly. When the glue is dry, the protruding ends are cut off and sanded flush to the wood.)
With this cedar bench perched in your front yard alongside the Japanese Torii gate featured in my January 31 column, DIYers can be assured buyers will be drawn to their homes like patrons to a fine art exhibit.
Get building. Spring is almost here.
davidsquare@yahoo.com