

By David Square
Planning and creating your own DIY Christmas tree is a design challenge and a delightful personal expression of your holiday joy. It also sustains the environment by eliminating the need to harvest live trees that clog landfills when their short lives are over.
The most intriguing DIY trees follow the less-is-more design dictum and are constructed of natural materials (driftwood, pine cones) or scrap wood that might otherwise end up in a firepit.
For this design I used:
• 6 pcs: 30” x 1” x ½” scrap spruce
• 1 pc: 25” x 1” x 1” scrap spruce
• 1 pc: 8”-round by 2” thick slab cut from tree
• 1 pc: ¼” dowel
• 1 pc: ½” dowel
• ¾” and 1¼” by #4 flat head wood screws.
Begin by creating two 60-degree equilateral triangles by setting your saw at 30-degrees and cutting the ends of the 6 pieces of 30” spruce at this angle. Use two 1” brads at each corner to temporarily hold the triangles together. Cut the bottom chord of each triangle in half and remove the brads from the apex. You will have four half-triangles.
Take your 25” x 1” square scrap of spruce and position one of the half-triangles against an edge. The end cuts of the apex and the bottom chord should sit squarely against the top and bottom faces of the square member. If necessary, trim the square piece so it is flush with the tip of the triangle. Use ¾” and 1¼” by #4 screws to secure the triangle’s apex to the square member, which is the tree’s trunk. As spruce is prone to splitting, bore countersunk pilot holes before screwing the pieces together. If the tree is to be disassembled, cover the countersunk holes with wood buttons which can be removed to allow access to the screws; otherwise, glue dowels into the holes and shave off and sand their heads when the adhesive is dry. Secure the remaining three triangles to the trunk’s faces in a similar manner.
For the base of the tree, I cut an 8”-round by 2” thick slab from a Manitoba Maple which had been blown over in the October wind, rain and snowstorm. The piece was still green and therefore tended to crack when brought into the house. However, it remained sufficiently intact to act as a stable base.
Drill a ½” o.c. hole through the base to receive a ½” dowel drilled and glued 2” into the bottom long grain of the trunk. Do not glue the dowel into the base if you wish to remove the base for storage.
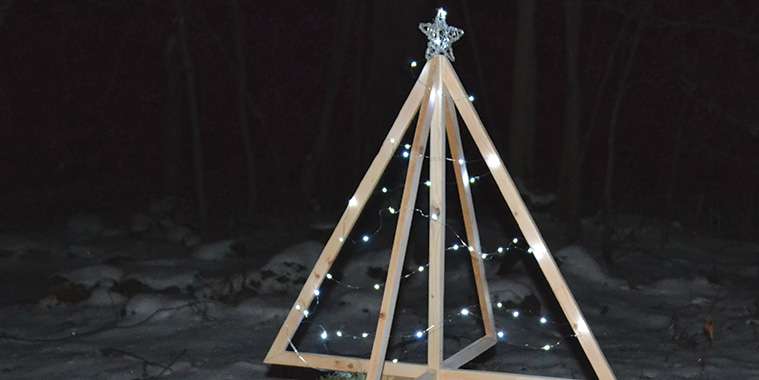
At the top of the tree, drill a ¼” hole about 1” deep into the trunk’s long grain. Glue a ¼” dowel into the hole, allowing the dowel to extend 3” or more above the tree. Use the dowel to support a handmade finial like a star.
To this point, screws aside, the tree is made of recycled materials. Now, however, you are required to decide the type of garland (if any) with which to trim your Christmas masterpiece. As our tree is outside, it is only visible during the short daylight hours. To overcome this problem, we purchased a string of mini-LED lights from Home Hardware for about $9. Though they do require AA batteries, the LEDs sparkle at night, lighting the yard and clearly defining the tree. They come with a timer that shuts down the LEDs so they conserve power by not operating all night.
There is less than a month until Christmas, so you had better build your DIY tree before Santa and his reindeer arrive to decide who has been both “knotty” and nice.
davidsquare81@yahoo.com