

An Aeolian harp requires only wind to pluck its strings to create a mystical, soothing sound played by nature.
Named for Aeolus, the ancient Greek god of the wind, a harp can be constructed by DIYers from a few inexpensive materials in a short time.
Materials:
• One pc. 1-inch by 4-inch by 8-foot select spruce (no knots)
• One pc. 7/16-inch by 8-foot dowel (must be hardwood like oak, birch or maple)
• One spool 30-pound test monofilament fishing line
• 20 pcs. 1¼-inch by #6 flat head brass screws, 20 pcs. ¾-inch by #4 pan head brass screws
• Handful 1/8-inch to ¼-inch diameter beads of any material with 1/16-inch hole
Tools:
• Bandsaw or jig saw
• Drill and bits
• Cabinet saw
• Sanding drum, orbital sander
There are numerous designs for Aeolian harps from small window boxes to large outdoor models that are many feet high. For this article, I modified a tall Japanese-designed harp to sit on a windowsill or an outdoor base.
Start by drawing patterns for the two upright posts and the cross chord on paper. Transfer the patterns to the 1-inch by 4-inch select spruce board. You should have a 24-inch piece leftover to build a sound box for the harp.
Use a band or cabinet saw to re-saw the 24-inch board into two pieces: one 3/16-inch thick and the other ½-inch thick. Rip the ½-inch board into two equal pieces about 1 5/8-inch wide. The thin piece is the harp’s sound board, and the thicker pieces are the sides of the box.
Glue and screw the sound board to the sides with #4 pan head brass screws, leaving a little overhang to prevent the screws from splitting the edges of the board. (Drilling a pilot hole for the screws is advisable.) Also, drill a 1-inch diameter sound hole in the centre-front of the box.
Cut holes into the face of the sound board spaced about 2-inches O.C. from either end of the box. Drill ½-inch holes at the O.C. marks, then cut out the rectangular shapes with a jig saw. The width of the rectangles will be ¾-inches, but the lengths will vary because of the curved uprights that will be fitted into the mortises. Remove a little bit of wood at a time until the uprights slide neatly into the holes, extending to the bottom of the box.
Secure the uprights by cutting ¾-inch wood scraps to the width and height of the box. (In my case, 2 ¼-inches wide by 1 5/8-inches high.) Push the scraps into either end of the box until they contact the bases of the uprights. Attach the scraps to the bases with glue and #6 screws. From the outside front and back faces of the box, drive screws into the scraps. (I added two extra scraps about 4-inches O.C. from the box’s centre to stiffen the sound board as well.)
Adjust the top chord so that it overhangs the uprights either side. The uprights should extend beyond the top chord as well.
Temporarily join the uprights to the top chord with 7/16-inch dowels that stand about ½-inch proud on either face of the wood.
Remove the chord and starting 2 ½-inches O.C. from the dowel hole in the taller upright, drill 7/16-inch tuning peg holes 1-inch O.C. into the chord until you are about 2 1/2-inches from the short upright’s dowel hole. (I required sixteen holes to span my top chord. There is no definitive number of strings required, though small window harps usually have between five and nine.)
Now secure the joins between the top chord and the uprights with glue and 1 1/4-inch #6 brass screws driven into the backside of the harp’s chord, either side of the protruding dowels.
Drop a plumb line from the first tuning peg hole to determine where the first string-hole will be located on the sound board. From this point, mark and drill the required number of 1-inch O.C. holes into the sound board with a 1/16-inch bit.
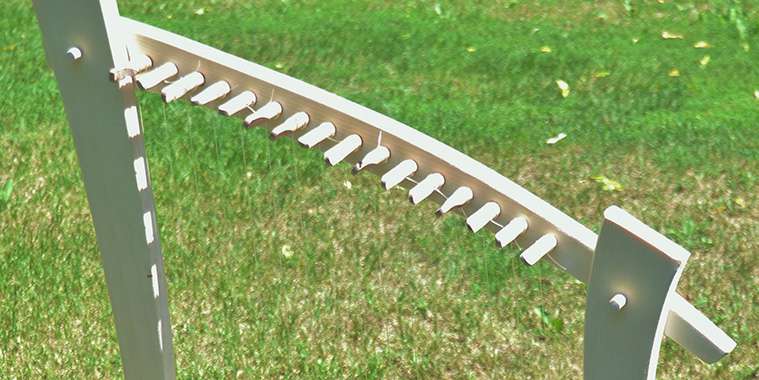
Cut the requisite number of 2 1/4-inch long tuning pegs from hardwood dowel that fit tightly into the 7/16-inch holes in the top chord. (If they are not snug, they will slip and the strings will go slack. If necessary, drill holes slightly smaller than the dowel’s diameter and tap them into place with a wood mallet.) Create a double-curve on one end of each peg with a drum sander and then drill two 1/16-inch holes through the dowel at I ¼-inch and 1 1/2 inches O.C. respectively from the tip of the dowel.
Cut generous lengths of fishing line to correspond to each hole in the sound board. Slide a 1/8 to ¼-inch bead onto the first string and tie a double knot in the monofilament, pulling it tight with pliers. (The beads prevent the monofilament strings from being pulled through the holes in the soft sound board when tightened.)
Finally, fit the lines through the holes in the sound board from the underside and pull them upward so they can be threaded through the hole closest to the top chord in the corresponding tuning peg. Wrap the monofilament around the peg several times, then thread the remainder through the second hole in the peg. Tighten each string’s peg with a crescent wrench without jaw teeth to prevent marring the wood.
I am still experimenting with my wind harp to find the optimum tightness for the strings. To this point, it seems taut strings produce more sound than slack ones. Strings can also be tuned to specific notes with an electric harp tuner.
davidsquare81@yahoo.com