

If you have dripping faucets in your home, you can stop the leaking by replacing the plastic cartridges hidden inside the taps.
As with most DIY plumbing ventures, it is an inspired idea to turn off the water supply before you begin to untighten things.
Open the cabinet door under your sink to check for shut-off valves. Most sinks will have off/on taps connected to the hot and cold-water pipes. If your lines are not equipped with these, you have two choices: turn off the water supply to the entire house or install Shark Bite valves on the half- or three-quater-inch copper or polymer water pipes under your sink.
Though Shark Bites tend to be a little more expensive than tap valves, the extra cost is overridden by simplicity of installation and, if required, ease of disconnection with a small O-shaped tool ($1.50).
To install these handy gizmos, turn off the main water supply, open the sink taps to relieve pressure in the lines and locate the hot and cold-water pipes under the sink. Use a compact hacksaw or a small wheel cutter to remove sufficient length from both pipes to allow the Shark Bites to be pushed into place.
The pipes should penetrate the valves’ barrels to a depth of one inch for a proper seal. A pencil line struck one-inch from the cut end of each pipe will guide you to the proper depth. (Burrs on rough saw cuts should be filed off and skewed ends squared up.)
With the new valves installed, turn them to the off position and open your home’s main water supply tap. Check for leaks under your sink. Unless the pipes have not seated in the valves to the required depth, Shark Bites will require no further adjustment.
Now remove the set screws at the back or side of the faucet’s tap handles with an Allen or hex wrench. When the handles are loose, lift them up and put them aside. Under each tap, there will be a cartridge secured by a retaining nut. Use a crescent wrench to carefully loosen the nut, as a pipe wrench or vice-grips will mar the metal finish.
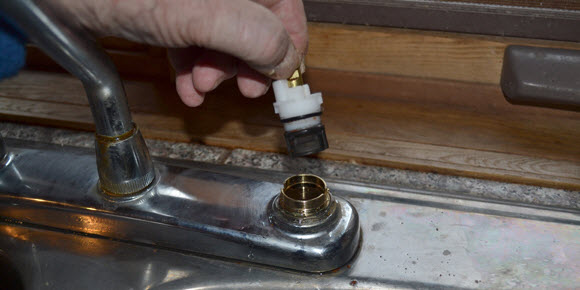
With the nuts unscrewed, grasp the brass shafts protruding from the cartridges and wiggle the cartridges out of their settings. A pair of pliers may be required to unseat cartridges stuck in place by a build up of sediment.
To make sure you have the correct replacements, take one of the old cartridges to a hardware or plumbing supply store for comparison. (Depending on the manufacturer of your faucet, some companies will not charge for replacement cartridges.)
Before installing the replacements, check to ensure that their orientation is the same as the old cartridges. It is possible to place new cartridges in backwards, resulting in water running from the faucet when the taps are in the closed position and vice-versa. If you make this error, remove the cartridges and give each a half-turn to seat it correctly inside the tap pipe.
If water is leaking from between the stem of the faucet and the hand-tightened nut that supports the faucet, untighten the nut and remove the friction-fit neoprene gasket that acts as both a swivel and a seal. There will also be a round rubber washer that should be replaced along with the neoprene gasket. As with the cartridges, it is a good idea to take the washer and gasket to a plumbing sales outlet to get the correct replacements.
Single lever faucets have only one cartridge inside the swivel tap assembly. Remove the faucet’s tap/lever with a hex wrench, as described above, to expose the cartridge. It will be held in place by a retaining nut and a U-shaped retaining pin. Unscrew the retaining nut with a crescent wrench and then pull the exposed pin outward with needle nose pliers to release the cartridge. Reverse the procedure to install the new cartridge.
1. Shark Bite shut off valves are easy to install and remove.
2. With the water turned off, loosen set screw with an Allen wrench to remove taps. (Bathroom taps have a cap in the middle that can be pried off with a pocket knife. Under the cap is a Phillips screw that is unfastened to remove the tap and reveal the cartridge.)
3. Use a crescent wrench to remove the nut that holds kitchen sink cartridges in their sockets.
4. Remove old cartridges by pulling upward with fingers or a pair of pliers.
5. Be sure new cartridges are oriented in the same direction as the old ones. It is possible to insert the cartridges backwards, with the result that the faucet will run when the taps are in the off position and vice-versa.
6. Replacing a rubber ring washer and a polymer gasket, will stop leaking between the faucet and the hand-tightened, cone-shaped nut.