

With winter about to pounce on us, it struck me that a timely project for DIYers is a “belly flopper” sled.
These light, speedy wood sleds were in vogue when I was a youngster, before the plastics industry began to churn out all manner of cheap downhill toys such as flying saucers, roll-up carpets and polymer luges.
I will admit that when I finally tried a flying saucer, it was a fun ride. But it was hard on the derriere, and the flimsy plastic was liable to crack in cold Manitoba winters.
My favourite sled was a varnished maple belly flopper with steel lined runners that would rocket down any hill. As I recall, it had the words Radio Flyer printed in fire engine red on the middle slat.
Red oak, maple, birch and ash are all good choices for sled wood. In my case, however, I used recycled western red cedar of which I have an abundance in my shop. Cedar has advantages such as lightness and natural resistance to rot. But disadvantages include low strength and softness.
My top wood selection for a belly flopper is hard maple because of its strength, tight grain and easy workability. Yellow birch is a suitable substitute.
Red oak and ash are more commonly used for dog sleds and sleighs that require steam bent parts.
Prices quoted by Windsor Plywood per linear foot of one-by-six-inch by S4S boards are: red oak at $5.20, maple at $5.50, birch at $6.30 and ash at $7.
To build the sled, you will need the following:
• Jig saw and builder’s saw.
• Screwdriver, electric drill, countersink, French curves and flexible metal rod.
• Sanding block or electric palm sander.
• About 12 linear feet of one-by-six-inch hardwood.
• Epoxy glue or outdoor equivalent.
• Flat head Robertson brass screws, No. 10 by 1 3/4 inch and No.10 by 1 1/4 inch.
• One quart, exterior polyurethane or equivalent finish.
• Steel banding, free from any lumber retailer.
I chose to call my bob sled design the Falcon Flyer in honour of the Winnipeg Falcons, the world’s first team to win a gold medal in Olympic hockey in Belgium in 1920.
The Flyer’s dimensions are 36-inches long by 16-inches wide.
Start by laying out a runner on a piece of drawing paper. To create the curves, use a combination of French curves and a flexible length of metal rod (see Lee Valley catalogue) that holds its shape while you work.
I made the bottom edge of the runner almost flat (very little rocker) because evenly distributed weight prevents the runners from digging into snow or ice. Speed skates are ground flat for this reason.
Trace the pattern onto a three-foot long by six-inch wide length of hardwood. Cut out the profile and hand hole with a jig saw. Create a second runner by tracing the first.
The sled can be made lighter by drilling large holes or cutting out shapes in the sides of the runners.
Be careful not to remove too much material, however.
With a builder’s saw, rip out two 1 1/4-inch battens by 22-inches long and two 1 7/8-inch joists or cross supports by 14 1/2-inches long.
Cut half-lap joints at the end of each cross brace and 3 1/2 inches OC from each end of the battens.
Drill four holes the same girth as the 1 3/4-inch brass screws through the edges of the battens, placing them at five-inches OC. Countersink the holes about 1/8-inch.
Align a batten flush with the top of a runner and about eight-inches back from the front of the runner. Put No.10 by 1 3/4-inch brass screws in each hole and tap gently with a hammer. Remove the batten and bore pilot holes where the screw tips have marked the wood. Experiment with scrap wood to get the diameter of pilot holes just right. They must be large enough so the heads of the soft brass screws do not twist off, but small enough so the screws grab solidly when tightened.
Apply epoxy to the appropriate edge of a batten and screw it firmly into position on the runner with a No. 2 Robertson screwdriver or screw drill. Do not over torque. Attach a batten in a similar manner to the second runner. The half-lap joints should face upward.
Employing the same drilling and countersinking technique, screw and glue the half-laps cut into the cross supports to the half-laps cut into the battens. Use the shorter No.10 by 1 1/4-inch screws.
Rip four top slats by 3 1/2-inches wide by 28-inches long and align one with the outside edge of a runner, about five-inches from the front. Temporarily screw the front and back of the slat to the top of the runner and to the cross supports. With a half-inch scrap of wood, space and loosely fasten the remaining slats in position, drilling and countersinking as you work across the sled’s top. The No. 10 by 1 1/4-inch screws should be 2 1/2-inches OC on each slat.
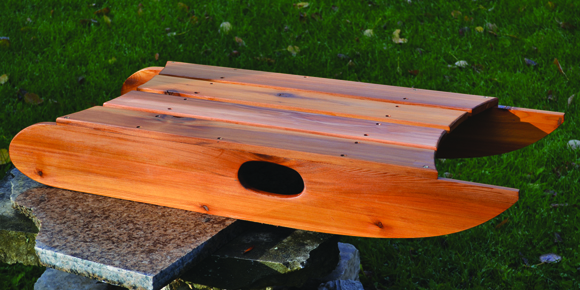
Use the flexible metal rod to create a pleasing curve at the front and back of the slats (see picture).
Mark the curve, remove the slats and cut out the wood with a jig saw. Chamfer all edges with sandpaper.
Use a sanding block or palm sander with No. 120 garnet paper to finish the sled. Sanding with paper finer than No. 120-grit will create a mill-like glaze on the wood, preventing the polyurethane from fully penetrating the wood. Fine sand with No. 320 wet/dry between coats for a silky finish. At least three are recommended.
To soup up the Falcon Flyer, attach a strip of three-quarter-inch steel strapping free from a lumberyard to the runners. Drill and countersink holes about every six-inches OC in the steel and screw to the underside of each runner with No. 4 by one-inch brass screws.
Final word: Belly floppers move fast. Be sure to wear protective gear when you launch your new sled.