

Beautiful windows with many individual lights or panes are rarely made nowadays because they are expensive to manufacture and to re-glaze. A modern technique to replicate a multi-pane window consists of a thin wood lattice with square or rectangular openings placed over a solid sheet of glass. This effort at trompe l’oeil is moderately successful from a distance, but the closer you get the deception becomes obvious, looking cheap and tasteless in my “good taste is timeless” opinion.
Before I continue, I should say that the purpose of this column is to explain how to replace a broken pane in a traditional window composed of muntins or sashbars joined by cope joints. I recently repaired such a window that came from a cottage at Victoria Beach.
But first, I’d like to share some fascinating information about glass that I gleaned while researching this DIY story. I used to believe that glass slumped due to gravity over a period of a few hundred years. The proof of this phenomenon was visually reinforced when I visited an Elizabethan mansion festooned with windows in England. The tour guide pointed out that the glass at the bottom of each window was markedly thicker than at the top. His explanation was that glass, like the human body, sags the longer it is exposed to gravity.
I was disabused of this account when I read that early glassmakers created flat panes by spinning molten glass into round plates. The plates were cut into panes of uneven thickness, the widest edge usually mounted at the bottom of a window’s frame. If you carefully examine old windows, you can occasionally find a pane that was installed with the thickest edge up (no downward slump), exposing the myth that solid glass is affected by gravity. I was shattered by this knowledge, but I eventually pieced myself back together.
Another fib I uncovered is that old glass, say 60-years-old, is brittle and, therefore, impossible to cut and recycle as glazing material. I know this is untrue because a glass sculptor of my acquaintance once placed an ad in a local paper asking people to drop off unwanted windows on his acreage near Carman.
The following week he ran another ad pleading with people to refrain from unloading windows on his property, which was beginning to look like the site of a Crystal Palace after a Category-7 storm. On the bright side, my acquaintance had sufficient glass to last him scores of years. Even more exciting, he could cut the antique glass into any shape without it shattering due to brittleness. He discarded badly scratched pieces, but, hey, when you have five acres of material to choose from you can afford to be picky.
My final somewhat shocking discovery — to me at least — was that a technique to produce uniformly thick plate window glass was not perfected until 1960 by a couple of Brits working in America. The two inventors floated melted glass on a bath of liquid tin, subjecting the top surface of the glass to pressurized nitrogen to obtain a polished finish. Prior to this, glass was mainly ground to thickness by machines and polished by industrial equipment.
The glass in the multi-pane window I repaired was likely produced in the late 1920s. It’s interesting to note that the panes are not of uniform thickness, some contain bubbles and others have slightly raised lines, suggesting that the glass was poured in several batches and the lines are the edges where the batches met.
Wear work gloves, goggles and boots (no sandals) when replacing glass. Tools and materials include a new glass cutter, putty knife, razor knife, pliers, glazier’s points, glazing compound, T-square and a replacement sheet of glass. A router or heat gun may also be needed.
1. Remove the old glass by tapping lightly with a hammer until it shatters. Use a pair of pliers to remove the shards from between the muntins and putty.
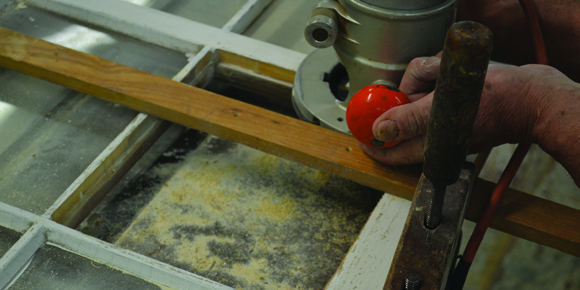
2. If the old putty was exposed to rain, it will likely fall away in chunks, though some cutting and prying with a razor knife may be required. In my case, the putty was rock solid and I had to resort to a router with a straight bit and a fence to remove the glazing (See picture).
Another technique is to soften the putty with a heat gun, but this will scorch the paint and require sanding and refinishing later. If you employ a router, use an old bit and wear good safety glasses because there are metal glazier’s points embedded in the putty.
3. When the glazing compound has been removed to bare wood, measure the length and width of the frame and cut a piece of glass 1/8-inch shorter than each measurement. This will leave a 1/16-inch expansion gap on all sides. You can have the glass cut at a hardware store or cut it yourself from a scrap. A T-square makes an excellent straight edge.
4. To cut glass, place the sheet on a solid, even surface such as a piece of ¾-inch plywood. Mark the length and width with a fine point Sharpie, align the T-square and then press firmly down on the glass with a new cutter held at about a 45-degree angle. The cutter should make a ripping sound as it scores the glass, leaving a discernible white line.
If you haven’t cut glass before, practise on a spare piece. Too much downward pressure can crack the pane, while insufficient pressure will result in a cut with skips. Ideally, you want to make a single pass with the cutter, however, it is possible to make several passes, the downside being that the final cut may have a ragged rather than a clean edge, not a serious problem as it will be covered with putty. Small bumps on the edge can be removed with flat-nosed pliers.
5. Align the score with the edge of your cutting table and push sharply downward on the piece of glass extending beyond the table’s edge. If you have an inch or less of excess glass to remove, it’s advisable to tap the underside of the score with the metal ball attached to the end of your cutter’s handle. As you tap, you will see a line appear in the score. Continue to tap until the line reaches the end of the score. The glass should separate on its own. If not, it can easily be removed with pliers.
6. Apply a small amount of glazing to the muntin before placing the pane inside the frame. Secure the pane by pushing glazier’s points into the four sides of the frame. (Points can still be purchased at most hardware stores.)
7. Traditional strings of putty are still available for glazing, but I used DAP’s Latex Window Glazing because it is water soluble and comes in a caulking tube with a wide spout cut at 45-degrees, making it easy to apply. I used masking tape to cover the top edges of the muntins before I applied the glazing. I only needed a single pass with a wet putty knife to create a smooth, sharply defined glazing bead.
Final note: A DIYer can save a fortune by re-glazing his or her own windows, especially if recycled glass is used. Just don’t advertise, unless you’ve got a lot of panes to replace.