Box beams are easy to build and are a less expensive way to cover teleposts in basements than purchasing pre-made MDF columns at big box stores for about $145 each.
Hand-made beams of cedar or other suitable outdoor woods also make visually enticing vertical supports for porch roofs, overhangs, newel posts and other uses. (They are not recommended for horizontal supports, which should be laminated beams or solid timber.)
A square or rectangular box beam with butt or rabbet joints is the least difficult to build, however, aesthetically they are the least appealing to the eye. For the small amount of extra time required, it is worth mitring the corners and reinforcing them with a spline. Unless it is closely inspected, a mitred box beam will look like a solid post.
I built a western red cedar box beam out of two-inch by six-inch material to serve as a newel post for a spiral staircase in my house.
A cabinet saw with a 10-inch blade and the capacity to rip a 45-degree bevel is required to create the beam’s sides and the slots for the splines in nominal two-inch thick lumber. Before you rip, calculate the outside dimensions of your beam. Allowing for saw kerfs, two-by-six-inch material will yield a maximum five-by-five-inch square beam. If you require something larger, use nominal eight-inch or wider lumber. Smaller beams can be built out of two-by-four-inch material. In this case, the maximum outside dimensions will be three-by-three inch.
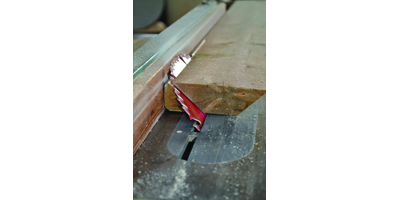
With your cabinet saw to a 45-degree bevel, rip the length of both sides of the four boards required to construct a square box beam. To cut the slot for the spline, I stack two 10-inch combination blades together because my six-inch dado blades are too small in diameter to make the cut. The 10-inch blades cut a quarter-inch wide slot which I set to a depth of 3/8-inches. I use a scrap of wood with a 45-degree angle to adjust the depth of the cut before I rip the slot in all the boards.
The splines can be pieces of scrap wood of the same material as that used for the box beam — this ensures the expansion/contraction ratio is the same; in theory, hardwood splines can crack when used in combination with a softwood such as cedar, pine or spruce. Ideally, splines should slide into the slots with minimal friction, leaving room for glue and a little wiggle room during assembly.
If you aren’t concerned about the look of the outside of a beam, it can be screwed or nailed together without glue or splines. However, I find that splines and glue are still worthwhile to keep the sides of the beam in registration, while a waterproof outdoor adhesive like two-part epoxy solidifies the entire beam. Screw or nail holes can be plugged or filled for painting, but the best exterior finish is obtained by assembling the box with splines and glue only, and then applying two or three coats of a transparent outdoor polyurethane stain.
For a more decorative look for a beam such as a telepost cover, an eight-sided or octagonal beam can be constructed by setting the saw’s bevel at 22.5-degrees and ripping eight pieces of wood to required length. As you work, make sure each ripped piece is pie-shaped, otherwise, you will end up with a parallelogram-shaped board that will end up in the scrap pile. Keep the blade at the same 22.5 degree angle to rip the spline slots.
To make a telepost cover, use nominal one-inch thick boards instead of two-inch material to ensure the inside diameter of the beam is large enough to fit around the telepost.
If you don’t own a lot of clamps, I have found the best and least expensive way to apply gluing pressure to a box beam is with tourniquets made from quarter-inch polypropylene rope and a scrap of wood to twist and tighten the tourniquets. Ratchet straps from big-box stores also do a good job, though they are more expensive.
To protect the beam’s corners, bits of heavy cardboard can be obtained for free from lumberyards where they are used to protect the corners of pallets of lumber.
When gluing up an octagonal telepost cover, apply adhesive to all the joints except the two opposite sides of the cover. Once the glue is set, the two halves can be separated, fitted around the post and then glued together with water-resistant white or yellow glue.
A fancy base can be made out of three-quarter-inch, or thicker, scrap material. Use a mitre saw set at 22.5-degrees to cut eight pieces that will create a frame that protrudes approximately one-inch around the outside diameter of the cover. A top cap made in the same manner, however, should be removable to allow the telepost adjustment nut to be fine-tuned if required.
To calculate the length of the wood pieces required to make a post cover with a six-inch inside diameter, draw a six-inch square on a sheet of paper and establish the centre by drawing diagonal lines from corner to corner. Set a compass the distance from one corner of the square to the centre point, and then draw an arc that intersects the centre of the square and two sides. Continue until you have drawn arcs using all four points of the square. Connect the points where the arcs intersect the outside of the square. The result should be an eight-sided figure with a 2 1/2-inch interior length and, if you are using three-quarter-inch material, a 3 1/8-inch exterior length.
The same layout technique can be used to calculate the outside and inside lengths of pieces that make up the base and cap.


