

By David Square
In this column, I was going to show how to complete the cedar garden bench featured in my January 19 article. However, due to the fact that any project takes ten times longer to finish than the ETC (estimated time of completion), I admit that the bench is not finished at press time. As the ETC is now early February, I will amuse you with DIYer jokes in this column. For example, why are dogs smarter than DIYers?
Answer: They lie in the shade and watch you sweat.
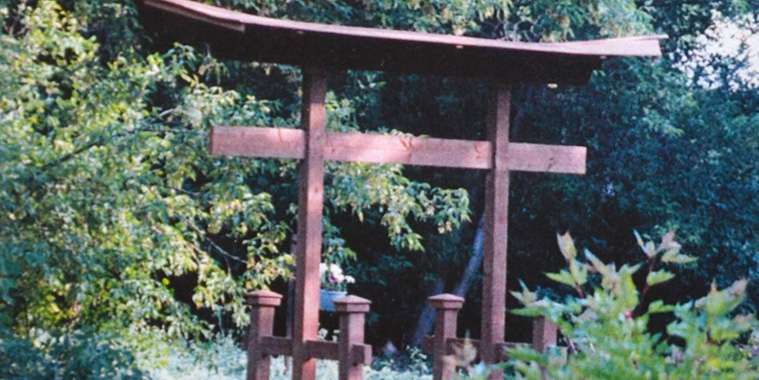
Speaking truthfully, the theme of this article is a continuation of last week: How to increase the curb appeal of your home by building outdoor projects that make your front yard a paradise of visual and monetary delight. To this end, I will show how to create a Japanese Torii Gate or “Gateway to Heaven.” According to Japanese tradition, the home, the garden, or a natural setting can become a living picture framed by the Torii, changing with point of view and the seasons.
Lumber required to build a Torii Gate:
• 4-pcs 4”x4”x8’ pressure treated brown stained deck lumber
• 3-pcs 2”x6”x8’ pressure treated brown stained deck lumber
• 2-pcs 2’x4’x8’ pressure treated brown stained deck lumber
• 1-pce 1”x12”x4’ western red cedar
• 7-pcs 1” x 6”x12’ shiplap western red cedar
Hardware required:
• 25-pcs #10x2½” brown treated socket deck screws
• 1 box #6x1¼” socket, flat head brass wood screws
Tools required:
• Jig or band saw, builder saw, router, drill and bits, outdoor glue
Directions:
Start by cutting four pieces of 47” long 4”x4” for the legs and then two pieces of 91¾” long 4”x4” for the roof upright supports. The legs are joined to the uprights with horizontal 4”x4” members 15” long, allowing for a 1¾” mortise and tenon either end. Shorter 6” horizontal pieces are also similarly joined to the outside face of each leg. The leg top caps can be purchased from lumber outlets or made with a band saw.
Cut dados into the tops and bottoms of the roof supports to receive a 2”x6”x88” board to add to the structural integrity of the area below the roof. Glue and screw the post pieces into the horizontal beam with 4x #10x2½” brown deck screws.
With a jig or band saw, make two 5¼” diameter circles from scrap 2”x6”. Drill a ¾” hole in the centre of both to receive a ¾” by 4½” hardwood dowel. At the same time, drill ¾” holes into the top of the roof supports as well as the bottom of the strong back.
Make the strong back from 2”x6”x8’ lumber by drawing a convex curve that is 3¾” at both ends and gently rises by ¼” increments every 6” of run until it is 5½” in the centre (the width of the board). Cut this piece out and reverse it to mark the same curve on the opposite face of the 92” long strong back.
The slightly longer (96”) roof ridge support is created in the same way as the strong back. In this case, however, the curve is more radical and is concave, as opposed to convex. From one end of a 2”x6”x8’, measure upward from the flat edge 5”. At increments of 7”, reduce the 5” measurement by approximately 7/8” until you reach the centre of the board, which should be about 1 3/8” thick. Cut out this piece of the concave curve and flip it to use as a template to mark the opposite half.
Now make 3 rafters 35” long from 2”x6” scraps. Mark a 5” long flat across the top edge of each rafter. Strike a line from either edge of the 5” flat to a point 5/8” above the bottom edge of each rafter. This line will be the slope of the roof.
With the strong back and the ridge support glued and screwed together with outdoor glue and #10x2 ½” screws, cut dados 1½” wide by about 1 ½” deep at the middle of each rafter. Cut similar dados into the top edge of the ridge board, spacing the first dado OC, and then measuring 32” OC on either side of the centre cut. Glue and screw the rafters into the joints you have cut into the top edge of the ridge board.
Leave at least a ¾” overhang when you lay your first 12’ shiplap roof board over the rafters. Use 3 #6x1¼” brass socket screws per board. When you reach the ridge on both sides of the roof, you will have to rip the top board in half to cover the ridge. I added two ¾” thick x1½” wide x 12’ long cedar boards with about a 22½ degree bevel on the long edges to create a more waterproof cap. I also caulked any gaps with a high quality outdoor roof material.
Make 4 rake edge rafters out of ¾”x ½” cedar. The only way to do this accurately is to hold a rafter under a rake edge and trace the outline of the roofing boards. There will be slight variations in the boards which can be duplicated with a jig saw to ensure a perfect fit. These rafters are also glued and screwed to the roof boards.
Aside from the curb appeal of a Torii Gate, how many people can claim they have a “Gateway to Heaven” straddling their front sidewalks?