

By David Square
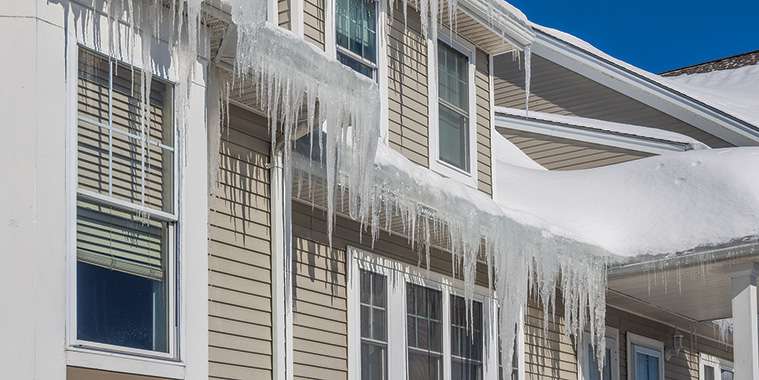
Icicles are cool because they switch colour as the day progresses, changing from yellow when the sun rises in the early morning, to sky blue during the day and to bright red at sunset. They are also a source of free popsicles for kids and are a herald of the upcoming Christmas holiday season.
Unfortunately, these sparkling tributes to winter are problematic if they hang from eavestroughs on your house, as they are a sign that heat is escaping through a poorly insulated attic.
Moreover, icicles that continue to drip in cold weather form ice dams inside gutters that prevent water from running off the roof, diverting it under shingles instead. The seeping water will damage the roof’s deck and, in time, other areas of a home such as ceilings and interior walls.
A stop-gap method to prevent ice dams from forming is to line gutters with heat tapes purchased from a building materials store. The tapes come in various lengths to accommodate most gutters. When plugged into a 120-V outdoor receptacle, elements inside the tapes generate heat to melt ice dams and icicles. Though tapes are effective, they are an unfavourable option to solve your problem because they are costly to purchase and expensive to operate. Moreover, they do not prevent heat escaping from your attic and, at the same time, substantially increase your electricity bill.
There are two ways to satisfactorily fix your ice problem: 1. Sell your house and move far away; 2. Take up the DIY banner and tackle the situation with a little cash and help from your friends. As a confirmed DIYer, I suggest the second approach. It will test your personal true grit and separate true friends from acquaintances.
How to begin
Find the trap door that leads to your attic. Before you force it open, take the preventive measure of covering yourself and the floor below with some sort of tarp. This way, when you open the door, you will be prepared for a cascade of sawdust, old newspapers, vermiculite and rodent skeletons, assuming your attic has any insulation whatsoever.
Before venturing inside the attic, don a pair of overalls, a dust mask (Uline.ca N95 $2 each) and a pair of safety glasses. (Goggles fog up.) If there is a layer of insulation in good condition already between the joists, then leave it in place.
Check for areas where light is visible through electrical boxes installed in the ceiling below. Small spaces between boxes are a source of heat that escapes into the attic. Fill the spaces with polyurethane spray foam. If there are a lot of cracks to be sealed, purchase a $40 reusable spray gun which is threaded to accept large cans of foam. Also, if not in place, staple insulation baffles between the rafters to prevent insulation from blocking incoming fresh air from the soffits. These baffles are especially important if you use loose-fill insulation that could otherwise plug the soffits.
Manitoba’s building code recommends R-50 to R-60 in attics of newly built houses because 20% to 30% of a home’s heat is lost through poorly insulated garrets. (There is a continuing debate as to whether a six-mil vapour barrier is required.)
If you decide to perform an insulation upgrade to an older home, you have a choice of insulations to choose from, including fibreglass batts, mineral fibre batts, blown-in loose fibreglass or cellulose and spray foam.
Spray foam has the highest insulation value at R-5.5 to R-6 per inch. However, it is the most expensive product available and, though DIY spray kits can be purchased for about $500, the results can be disappointing if the chemicals are not precisely mixed when they exit the gun. Personally, I would hire professionals for this job as they are experienced and own commercial application equipment, including mixing tanks, guns, goggles and respirators.
Cellulose is a loose-fill material that is ideal for attics because it is denser than fibreglass or mineral fibre that are commonly blown into existing walls. Building materials stores rent cellulose blowing machines that require at least two people to operate; one person to toss cellulose bales into the hopper and the other to operate the hose in the attic. A patient DIYer can blow this insulation into nooks and crannies that cannot be accessed by solid batts or rigid foam boards. Diligence will create a tightly sealed attic.
Mineral fibre is sold at home improvement centres, mainly in 16” and 24” batts about four feet long. It has a lower insulation value than fibreglass, but it has superior fire resistance and sound-proofing characteristics.
Pink fibreglass batts are the most common form of insulation used in residential and commercial construction. They are of similar size to mineral batts, but their R-value is slightly higher. Both types of insulation can be blown into attics. However, the toxicity of the fibre dust requires workers to wear sophisticated protective gear. Best leave this job to professionals.
For DIYers, the most economic and easy-to-install insulation is either fibreglass or mineral batts. When used to insulate an attic, the batts should be placed between the joists (normally 16” or 24” OC) and pushed firmly against the insulation baffles. Gaps between the joists and batts can be filled with cut offs. When the insulation is at the height of the joists (3½” to 5½”), the next layer of batts should be laid perpendicular to the first. Continue to add batts in a similar manner until the attic is full. In small attics, it is difficult to insulate the entire space to R-50; however, if air leaks have been properly sealed, you will have solved your icicle/ice dam problem. Now you will have to seek out a house in the neighbourhood with poor attic insulation to get a glimpse of those glorious harbingers of Yuletide.
davidsquare81@yahoo.com