

Door harps are traditional instruments that welcome friends and family into a home by playing a soft melody.
Their history is rife with debate. Scandinavians, Irish and Jews all lay claim to creating the first door harp; however, it is likely that the latter have the strongest argument as David played a harp to soothe King Saul in biblical times. By comparison, the Irish and Scandinavian harp is believed to have been invented about 700 years ago.
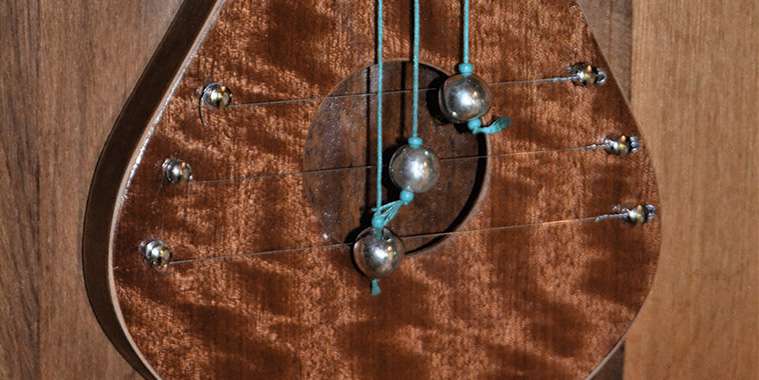
Be this as it may, the door harp is a self-playing descendant customarily attached to the inside of entrance doors. When the doors are opened, the movement sets three or more balls hung from pegs at the top of the harp into motion, striking tuned strings to create a pleasing sound.
DIYers can make their own door harps with a few inexpensive materials and tools, including:
• Two square feet 1/8-inch Baltic birch plywood
• Three steel guitar strings (E, B and G)
• Steel pegs scrounged from cheap guitars, ukuleles or similar instruments
• Three wood or metal balls
• Veneer (Lee Valley sells a pizza box of 20 species for about $60)
• Solid piece ¾-inch hardwood or softwood, 8-inch by 12-inch
• Jig saw or band saw, drill, hole saw, palm sander, flush-edge router bit.
Begin by sketching the shape of your door harp onto a sheet of paper. There are dozens of designs available on the internet, or you may choose to create your own original form.
Use a French curve to perfect rounded sections and transfer the drawing to the solid wood. Saw out the contour on one side of the design only. With a marking gauge set at about ¾-inch, scribe a line by following the outside of the cut shape with the gauge. Draw a vertical line down the centre of the board and rip it in half. Cut along the scribed line with a jig saw or band saw. When completed, flip the sawn piece, align its top and bottom with the centre line and strike a line along the inside curve of the shape. This technique ensures both sides of the harp’s body are symmetrical, and it makes removing waste wood easier with a band or jig saw. Use yellow glue to join the two sides together.
When the glue is dry, trace the frame of the harp onto a sheet of Baltic plywood. Cut the plywood slightly larger than the frame to allow for trimming later on.
To save time, jig saw or band saw both pieces of ply together. They are the front and back faces of the harp.
Veneer the instrument’s outside front with a wood of your choice, using contact cement as discussed in previous articles. (I chose figured makore, a lovely western African hardwood with a quilted figure and a warm cinnamon colour when varnished.)
Veneer both the inside and outside of the harp’s back with a similar veneer or mix them for a varied appearance. Use a high penetrating gel product if you decide to stain the instrument.
Strike a horizontal centre mark in the harp’s front piece and use a 2-inch hole saw to cut out a sound hole. Now clamp the top and bottom faces to the solid wood frame with yellow glue.
Drill three holes in a triangular formation at the top of the instrument to receive pegs from which the striking balls will be hung. Similarly, drill three holes into the solid wood frame either side of the sound hole for the tuning pegs. The holes should be aligned so that the guitar strings all pass over the sound opening. The pegs need to be tapped into the holes so they are sufficiently tight not to slip when tuned.
The wood or metal striking balls require about 1/16-inch holes through their centres to allow them to be hung from the upper pegs by plain or coloured string. To adjust the strikers over the center of each guitar string, twist the upper pegs.
Hang your door harp with picture frame hardware or a counter-sunk steel screw driven through a hole drilled near the top of the instrument.
Your lovely little instrument will provide years of melodic “harpyness.”
davidsquare81@yahoo.com