

The question of whether to restore or not to restore antique or collectible furniture has an equal number of supporters and detractors.
Some folks claim that it is a sin to fix broken joints or to remove the patina that has built up on the surface of aged furniture; while others believe function and appearance trump dysfunction and, dare I say, a ratty appearance.
(Antique furniture is 100-years-old or more, a collectible is a retro piece that represents an era such as the 1950s.)
When it comes to collectibles, I’m on the side of the restorers; antiques are a subject for another column.
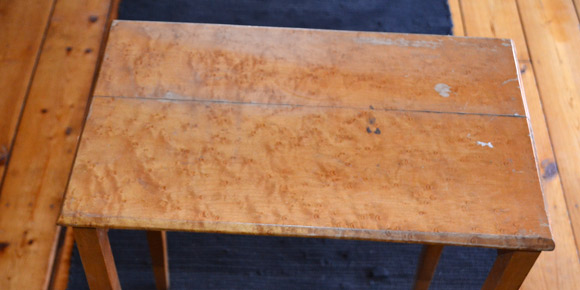
With this in mind, I will tell how I rebuilt and refinished a nesting table with a beautifully figured bird’s-eye-maple top.
Stop-gap measures
The table, which had been handmade in the 1940s or 50s, was held together by finishing nails driven through the legs at an angle into the aprons, a stop gap measure taken by some well-meaning person to reinforce the loose dowel joints. As well, the lovely top was disfigured by a dollop of paint and round moisture stains from glasses. Moreover, in some areas the finish was gone, and the top had split open along a join.
I removed the finishing nails by straightening their clinched tips on the back side of each apron, then gently tapped them out with a small hammer. I filled the nail holes on the outside of the legs with a mixture of maple sawdust and fast-setting epoxy.
The back apron remained firmly joined to the two back legs by the original dowels. Rather than attempt to break the joints and damage the wood, I used a hand saw to separate legs from the aprons by cutting along the joint line. I then squared the ends of the aprons with a chop saw and flattened the rough kerf on the legs’ upper section by skimming the surface on a jointer. I elected to use this procedure on all the legs and skirts as it cleaned up a lot of surface crud that had accumulated between the loose joints over time.
As the table was one of three nesting units, it did not have a front skirt so I created one from a spare piece of maple.
Use maple veneer
The four skirts were drab in appearance compared to the eye-catching top, so I decided to cover all the aprons with highly figured bird’s-eye-maple veneer. Veneering is easy to do on small pieces of substrate. In this case, I removed the varnish finish on the skirts with a cabinet scraper and furniture stripper. I cut my veneer with a box knife so it was about 1/8-inch larger than each skirt all around. Then I brushed a coat of contact cement onto the backs of the veneer and the fronts of the aprons. When the cement lost its gloss (about 20 minutes), I placed wax paper over the skirts, lined up each piece of veneer and proceeded to move the paper slowly out of the way as I pressed the veneer firmly down with a brayer. (A veneer hammer or small length of hardwood will work just as well.) Finally, I removed the excess veneer with a router and an edge trimming bit.
The top was held in place by slot screws countersunk into the bottom edges of the aprons. There was no allowance for seasonal movement, which may explain the separation along the join in the table’s top.
Never joint against the grain
I rejointed both sides on a jointer, checking carefully beforehand for areas where tear out might occur by running a finger along the edges. As a rule of thumb, (no pun intended) a delicate sense of touch will reveal in which direction the grain runs. In figured wood, never joint against the grain, if possible, to avoid tear out.
I rejoined both halves of the table top with three #0 biscuits and a generous application of yellow carpenter’s glue. I used two bar clamps to squeeze the halves together, removing excess glue with a damp cloth. (It is much easier to clean up adhesive before it sets.)
As rock maple is a dense wood, I sanded the re-glued top with a belt sander, starting with #80-grit and ending with #120-grit. I used a palm sander with #120-grit to remove any scratches left by the belt sander and to smooth the top’s edges.
When all the table’s pieces had been stripped and sanded, I applied two coats of maple gel stain with a cloth to each one. After sufficient drying time, I applied three coats of fast drying, oil-based, gloss polyurethane, allowing about eight hours between coats as recommended by the manufacturer. (I sanded lightly between coats with #320 wet/dry paper to remove surface imperfections.)
The last step required rubbing out the polyurethane with 0000 steel wool (until the gloss was flat), followed by two coats of carnauba wax buffed between coats with a lamb’s wool or equivalent pad and a 3/8-inch hand drill.
Finally, I reassembled the table using #0 biscuits in place of the dowels to join the legs to the aprons, reinforcing the joints with handmade wood corner braces.
To my eye, the refurbished table looks many times more beautiful than it did before the reclamation procedure; moreover, it is now a functional, stand alone piece of furniture.
davidsquare81@yahoo.com