

After 40 years of contending with a sticky kitchen cabinet drawer mounted on wood guides, I recently decided to make the drawer easier to open and close by attaching metal slides to it.
My initial inspection suggested it would be simpler to reduce the width of the drawer to make room for the new slides, rather than attempt to widen the cabinet itself.
I bought 18-inch-long side mount slides that require about a half-inch clearance between the drawer’s sides and the cabinet’s sides. I considered under-mount slides but decided against the idea when it became apparent that alterations to both the cabinet and drawer would be needed to install them.
The old drawer squeaked in protest as I worked it out of its ancient cavity and carried it to the workshop to undergo a long-needed upgrade.
To reduce the drawer’s existing 15-inch width to 14-inches (creating a half inch of clearance either side for the slides), I had to disassemble the box.
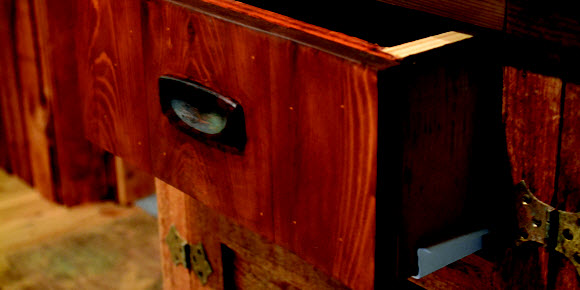
To remove the drawer pull — a lovely piece of cocobolo I had bought at a garage sale — I had to chisel off the cedar finish boards glued to the front of the drawer to get at the screws that held the pull in place. The face boards had developed an unattractive, grungy patina and required replacement in any event.
The entire box was constructed of three-quarter-inch G2S Baltic birch plywood, which by today’s standards is an excessive use of an expensive material.
However, back in the day, when I was an 18-year-old apprentice, custom-built cabinets were constructed of Baltic birch, because of its thicker face veneer, solid wood laminates and void-free structure. Nowadays, the majority of mass produced cabinets are made of particle board covered with a thin wood veneer or polymer facing material.
If you are willing to spend an extra buck on cabinets, many ready-to-assemble (RTA) products are constructed of quality plywood and solid wood, including the drawer boxes and doors. RTAs are ideal for DIYers who are willing to invest their sweat equity into assembling and mounting them.
To reduce the drawer’s existing 15 inch width to 14 inches, I disassembled the box. The rabbet joints were glued and nailed with 2 1/2-inch finishing nails and, as a result, I encountered some plywood tear out during deconstruction. I was able to remove these flaws later when I shortened the front and back of the box by one inch, allowing me to recut the damaged joints. The drawer’s bottom consisted of four three-quarter-inch cedar boards held loosely in place by a slot joint to allow for seasonal movement. These boards also had to be shortened.
I used yellow carpenter’s glue and 1 1/4-inch drywall screws to reassemble the box. I prefer drywall screws because their coarse, sharp threads hold wood joints together better than other fasteners. Moreover, drywall screws can be driven into most softwoods without the need of a pilot hole. (Dense hardwoods like maple, birch, walnut and oak require a pilot; otherwise, the wood will crack or the head of the screw will twist off.)
I cut and clamped together three new pieces of cedar to replace the originals I chiseled off the box front. Applying yellow glue to the cedar, I placed it over the box’s front, allowing a half inch of overhang on either side to hide the slides. Using pneumatic brads to keep it in position, I then clamped it firmly for 24-hours.
The following day I used a router with a half-inch carbide straight bit to cut a mortise in the finished cedar front to receive the cocobolo drawer pull. If you look at the picture of the original drawer, you will notice that the pull is designed to be inlaid, not screwed into position. My excuse for attaching the pull incorrectly is that I did not have access to a router all those years ago.
I properly installed the pull by centring it in the middle of the drawer’s face and tracing around the pull’s inset edge with a pencil. With the router set to depth, I removed the waste wood inside the pencil line. Over the years, I’ve become quite adept at following a pencil line free hand with a router. However, for fine work I trace the circumference of an inlay with a sharp utility knife, knock out the waste wood with a router to within 1/32nd inch of the incised line and then insert a sharp palm chisel into the incision to precisely slice away the remaining wood.
I used European-style drawer slides, because they are well made, quite inexpensive and can be attached with a few screws, usually included with the mounting instructions. It is possible to purchase (for more money) slides with a built-in soft close feature, considered de rigueur by commercial cabinet makers and their clients today. However, a DIYer can adapt inexpensive cabinet door soft close hardware (about $3 each) to work on a drawer.
But that’s a topic for next week’s column.