

Part 3
In this third column on installing wood-burning stoves, I will show readers how to build a DIY hearth that meets the Canadian Fire Code.
Factory-built hearth pads can be purchased from wood stove retailers for about $500 to $600, depending on the size of your appliance. As my wife and I bought one of the biggest stoves available, the cost of a pre-built pad would have been in the $600 range.
We elected to build our own pad for two reasons: DIYers never pay retail and the pads were only available in two colours, none of which matched our teal carpet.
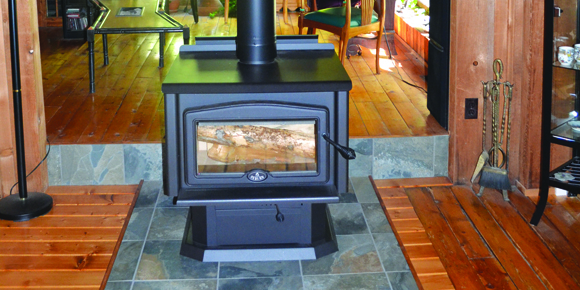
After a somewhat exhaustive search that included a trip to Italy (just kidding), she located a porcelain tile with a preponderance of teal interspersed with light and dark grey-blues, including, but not limited to, hints of cinnamon and chestnut. She found this beautiful tile and all the material necessary to build our own hearth at a Rona store, just 20-minutes from our home.
For a hearth to meet the Canadian Fire Code and the scrutiny of an insurance company, it must have two non-combustible layers consisting of a cement substrate such as Perma Base, sold in half-inch by three-foot by five-foot sheets, and a finish covering of tiles or other approved non-flammable material. (A hearth pad is not required on a concrete basement floor.) As our base is 48-inches wide, we had to buy two sheets of Perma Base to obtain the required width.
The quickest way to cut the cement board is to score it several times with a utility knife and then snap off the required piece. To join the pieces, we used self-adhesive fibreglass tape available from most building material stores.
We nailed our completed 48-inch by 60-inch pad of cement board to our hardwood floor with 1 1/4-inch galvanized roofing nails on eight-inch centres. (Nails should be three-quarters of an inch from edges and two-inches from corners to prevent crumbling of the board.) We spread a layer of thin set mortar over the fiberglass taped joint, feathering the mortar out about eight-inches either side to ensure a continuously smooth surface.
Tile patterns can be as simple or as intricate as you like, depending on the amount of time you want to invest in cutting and laying tiles. As we both have previous experience cutting tile, we decided to keep the pattern simple: no circles, triangles or exotic shapes.
My wife made four separate drawings of the same tile layout — one in full colour — to confirm our measurements were correct. We used as many full-sized tiles (13-inch by 13-inch) as possible, limiting our cuts to about a dozen four-inch by 13-inch edge tiles, ripped on a wet saw with a diamond impregnated blade. (Softer, less decorative tile can be scored with a masonry disc, then snapped apart like a sheet of scored glass.) We spent $100 on the wet saw to eliminate unsightly chipping of the edges of the glazed porcelain tiles we used for our pad.
Before laying tile, a dry run, so to speak, is good practice. Using quarter-inch cross-shaped plastic grout spacers purchased with your mortar, place each tile in its designated position according to your drawing. If your calculations are correct, the tiles’ outside edges should be flush to the four sides of your concrete substrate. If not, you may be required to discreetly widen or lessen the gaps between rows of tiles to make up the difference, or, in the worst case, you may need to recut some of the tiles. For this reason, it is wise to buy a few extra tiles when you make your initial purchase. If you wait, you may not be able to find an exact match to your existing ones.
We used thin-set polymer modified mortar to adhere our tiles to our approximately 20 square foot substrate. The mortar sets within 20-minutes, so you might want to mix several small batches to avoid anxiety attacks.
Dry mix the thin-set with a half-inch drill and a mixing paddle in a sturdy pail, then slowly add water until the mortar has the consistency of cake icing made of confectioner’s sugar. Let the mortar sit for about 10 minutes to allow the ingredients to “slake” or fully combine.
Mist concrete board substrates with water before applying the mortar; otherwise, the concrete will absorb moisture from the mortar, weakening its bonding strength. We used a quarter-inch notched trowel to spread the thin-set, starting at a back corner of the substrate.
(On a large area such as a floor, the first tile is normally laid in the middle. But on a small surface that has been dry laid in advance you can be confident that you will not encounter any unexpected overhang or under coverage at the edges of your substrate.)
Using your trowel, scoop a generous amount of mortar from the pail, spreading it at a 45-degree angle to the substrate to ensure a good bond with the tiles. Being angst-ridden, non-professionals, we only spread sufficient thin-set to lay two tiles at a time.
Remember to press each tile firmly into position so that it seats firmly on the substrate (no mortar holding it up), make sure it is accurately aligned and use a thin stick to remove excess mortar that may ooze up between the grout lines. Also, place your plastic spacers at a right angle to the tiles so they can be easily removed once the mortar has set. (see picture).
We waited 48 hours for the thin-set to dry before proceeding to the grouting process. Grout is sold in a variety of colours and is available as a sanded or an unsanded product. Sanded is recommended for floor tiles because it is stronger and more resilient to traffic than its unsanded counterpart. Moreover, unsanded grout tends to shrink when it dries. It is generally recommended for use with tiles with a thin grout line and a fine finish that could be scratched by sanded fillers.
Grout is first dry-mixed like mortar in a pail. Add small amounts of water until the grout has a buttery, not soupy, consistency. We spread grout over the gaps between tiles with a plastic scoop, then used a float (a tool with a handle and a flat polymer surface) to force the grout into the spaces, creating a smooth finish that was level with the tiles.
Grouting is messy work that creates a wet haze on top of your lovely tiles. Wait about 10 to 15 minutes for the haze to dry and then use a damp sponge to wipe it off. Have a clean pail of water nearby to rinse your sponge as it will take several passes to completely remove the haze. To ensure the tiles’ surfaces are free of excess grout, rub a damp white cloth across their faces. If they are clean, the cloth will remain white. If not, continue to sponge.
Wait about a week before sealing grout with a commercial product like Tile Lab. Apply as many coats as needed with a small paint brush until there are no dry spots on the grout lines.
Finally, we framed the edges of our pad with hardwood because the distance from the stove’s base to the wood trim is 11-inches, well beyond the requisite eight-inches to a combustible material. Because commercial pads are smaller, they are usually trimmed with angle iron. DIYers can build their own metal frames by purchasing angle iron from scrap metal dealers.