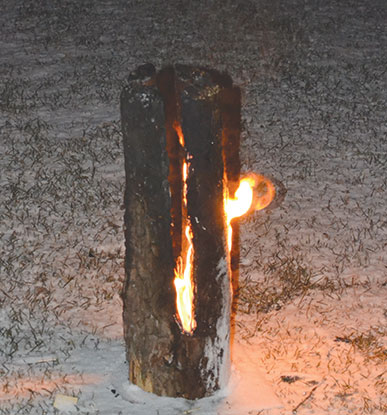
Log lanterns are a lovely way to add good vibes and atavistic beauty to a backyard patio or garden path. They can be built by a DIYer with a minimum number of tools and will burn for several hours or until the log is consumed.
The type of wood is not critical. The most important factor is that the interior is dry (about 12 per cent moisture or less), otherwise the lantern will not burn. I’ve had success with hardwoods like ash, elm and paper birch as well as softwoods like tamarack and jack pine, though the higher resin content of the latter two makes them burn faster.
The easiest way to construct a lantern is to split a 12-inch or longer log about eight inches in diameter into four equal sections. Move one of the sections out of the way so that kindling can be placed in the centre of the log. Kindling can be anything from birch bark to dry twigs to wax-impregnated cubes sold as fire starters at big-box stores. If you experience ignition problems, a small glass or metal container filled with kerosene with a lamp wick protruding will provide sufficient heat to fire the four sections of the log.
The burn rate can be adjusted by moving one section closer to the centre to reduce oxygen intake or moved away to increase oxygen to accelerate the combustion process. Be sure to place the lantern on a raised stone base to prevent fire from igniting dry grass or other flammable material at ground level.
A slightly more complicated design requires a chain saw to make. The idea is similar to the quartered log, however, in this case, the log is quartered about two-thirds of the way through by ripping kerfs at right angles with a chain saw. Two passes with the chain are required to make the kerfs sufficiently wide to allow combustion to take place.
Kindling is pushed into the kerfs, starting at the bottom, and then moving upward until about half the length of the cuts are filled with ignitable materials. Paraffin, the kind home canners use to seal produce, poured over the kindling from the top of the log is a quick way to get a stubborn lantern to burn. If, after many attempts, a lantern refuses to ignite, the moisture content inside the log is too high and it should be rejected in favour of a more suitable candidate.
Yet another technique requires one-inch and three-inch auger or Forstner bits and, in my experience, a drill press to apply sufficient downward pressure to bore a three-inch hole into the end grain of a log. This feat can also be accomplished on a lathe equipped for boring or with a half-inch electric drill or, if you have the time and strength, a hand brace with a really sharp auger in the chuck. No matter how you accomplish the task, the hole in the end grain should be on-centre and drilled to a depth of about six-inches.
From the top of the log, measure downward and mark an “x” with a felt pen on the outside of the log at the same depth as the inside hole. The x-mark is the point at which a one-inch hole will be drilled into the side of the log until the bit penetrates the large burn-hole in the centre. This smaller hole acts as an air intake to allow fresh outside oxygen to mix with the kindling to start and to continue the combustion of the lantern. I’ve found that an intake hole drilled at an obtuse angle in relation to the vertical burn-hole will increase combustion rates.
When drilling this hole, it’s a good idea to spike, screw or use a set of log-dogs to secure the lantern to a solid, flat wood base. By design, logs roll around when placed on their sides.
Obviously, logs with larger girths will last longer than smaller ones. However, my experience suggests that logs with a six- to eight-inch diameter are optimum for lanterns, because their interior cells dry more quickly than larger ones and they are easier to find and handle than big brutes.
Advantages of log lanterns are they do not require wiring, consume no electricity and their light is much more appealing to the human eye than LED or other bulb illuminated lanterns. Moreover, wood lanterns produce enough heat to boil water, cook food (hot dogs and marshmallows for kids) or provide a source of warmth during outdoor parties on cooler nights. Furthermore, they are a renewable green product derived from natural material. And finally, they are not manufactured in an off-shore factory in Asia. They are made-in-Manitoba creations crafted by hand by people who care about nature and natural aesthetics.


