

If your home was built prior to the 1980s, it’s possible you’ve made a surprising discovery beneath your carpet, vinyl, or laminate flooring — a once-gorgeous hardwood floor.
The prohibitive complexity and price of maintenance and repair prompted many homeowners, in previous decades, to cover them over with more cost-effective flooring options. Modern technology, along with DIY know-how, means breathing new life into an old hardwood floor is not only less costly, but a fine way to beautify your space and boost the value of your home.
Ripping up carpet
If you’ve just stumbled upon this exciting revelation or are curious to know if hardwood flooring is hiding in your home, our previous article focused on how to properly remove old carpet. We looked at checking for hardwood floors without causing undue damage, as well as the steps you should follow to remove carpeting on your own and when to call a professional.
If you’re ready for the next important steps to renewing a hardwood floor, let’s get started.
Examine and analyze
Before you run off to the store with dreams of gleaming hardwood floors dancing in your head, remove all furniture and wash the floor thoroughly, then carefully examine every part of the floor to determine how to proceed. Remember, this floor can be more than 40 years old, and as old as Queen Victoria if you live in a century home!
The key things to look out for are:
• Long or deep gouges
• Rotten wood
• Cracks and splits in the boards
• Wide gaps between boards
• Protruding nails (in case any were missed when removing your carpet)
• The original wax finish
• Stains or embedded dirt that doesn’t wash off
If any of the above are present, you’ll have to perform some repair work, which could require fillers, sanding, refinishing, and possible board replacement, depending on the type and extent of wear and damage. On the other hand, if the deep clean reveals a floor with only superficial scratches and wear, you can count your lucky stars, because refinishing will be a much simpler task for you.
A simple refinish
Renewing hardwood flooring that no longer has the original wax finish, and no deep gouges or dents, may only require a wood floor renewal kit from your local hardware store to revive it to a luscious shine. Just bear in mind the polyurethane finish requires 24 hours to set, then seven to 14 days to cure — important factors if you have pets or young children. We’ll go over the steps involved with applying finish shortly.
Repairing hardwood flooring
A wood restoration kit will come in handy to address deep gouges in hardwood flooring. If you have squeaky floorboards, now is the perfect opportunity to hammer those down since you’re already in repair mode — unless you rely on this built-in security system for monitoring teenage past-curfew entries!
Where rotten, split, or cracked boards are concerned, replacing affected sections is the best solution. If you’re experienced with a circular saw, this is something you can handle on your own, but if you are unsure, then you may want to call a carpenter or flooring professional for these repairs. The key challenge is properly matching the colour and grain of the floorboards as best as possible, which can be difficult with some older floors.
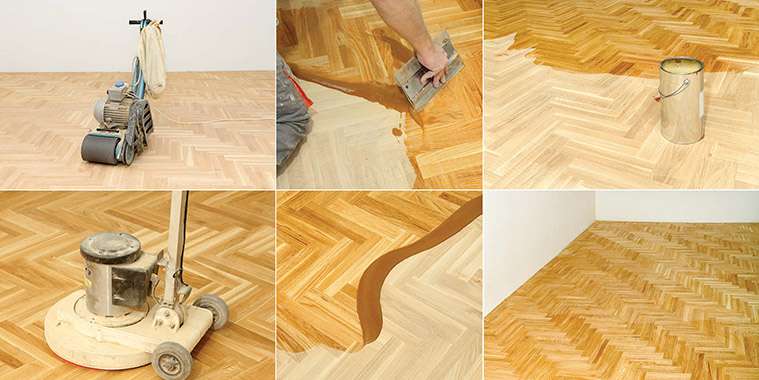
Sand the floor
Here’s where things get dusty, so don a respirator and safety goggles before starting. If you need to remove a layer of embedded dirt or the original wax finish, a belt or drum sander is key — just remember to remove any baseboards and use a floor scraper or putty knife to double-check for any protruding nails before sanding.
Begin with a coarse sandpaper between 36 and 40 grit, and work your way gradually to a finer grit with each pass. Use 60 grit for your second sweep, then 100 grit to smooth the surface further. Remove any dust and debris by sweeping and vacuuming (with a shop vac, not your regular vacuum) between each pass, and use a floor edger or disc sander to get all the corners and edges for a uniform finish.
One final sanding step will help give your floor that professional look — use a floor buffer and fine-grit screening pad with broad sweeping motions to smooth any unevenness or sandpaper scratches. Give the floor another good sweep and vacuum, then use tack cloth to collect any remaining dust particles before applying stain or finish.
Stain and finish
If you’d like to re-stain or change the tone of the floor, now’s the time to select an interior wood stain based on the type of hardwood or desired colour. Work in smaller areas and systematically apply with foam applicators, removing any excess stain with a clean, cotton rag or paper towels.
If you don’t wish to use stain, apply a sanding sealer before finishing.
Once you’re finished with either of the above, you’re ready to apply the finishing coats. Oil or water-based polyurethane wood finishes are the most commonly used these days, with oil-based being the more advisable option as it is thicker and provides a smoother coat. Wood oils like teak, cedar, tung and Danish, are also popular options. Always be mindful of fumes, wear a respirator, and ensure proper room ventilation.
Using a lambswool roller or applicator, apply three coats of oil-based finish, or four coats of water-based, sanding lightly between each coat using an extra-fine 220-grit sandpaper or #000 steel wool. This scuffs the surface to allow for the next coat to properly adhere. Be sure to vacuum the dust up before applying the next coat.
Once the final finish has dried (at least 24 hours), replace the baseboards. Apply felt pads to the feet of all furniture, and limit traffic in the room for seven to 10 days, allowing the finish to fully cure.
Caution: Always hang dry oil-soaked rags thoroughly outside and away from any buildings or structures before disposing of them. Wet, oily rags produce their own heat and present a serious fire hazard.
There’s no mistaking that even with a simple
refinish, this can be a time-consuming undertaking, but the rewards make it worth the effort. What better conversation piece than a gleaming, beautifully-restored hand-finished hardwood floor? Of course, you may decide after reading this to leave this job to a professional, and that’s OK!! The end result is what’s most important, and as long as you’re happy with the outcome, that’s what matters most.
— Realtor.ca