

Every winter ends up the same — cold and dark — especially once the holidays are over and people stop turning on their Christmas lights.
Humans, being creative and ingenious, have come up with many ways to fight back the winter doldrums and darkness. One great way to do that is with do-it-yourself and easy to make ice luminaries or lanterns. They’re a glamorous way to light up your walkway or porch when you have guests coming over for the holidays or any occasion during our coldest months.
Who came up with the idea, you may ask? Many cold-weather cultures claim the invention of the ice lantern — Finland, Norway, Russia, Germany, China and Japan. Given their winters, they all naturally have traditions about ice, not just as a tool but as an art form. And with most tools that hold symbolic meaning — like the broom or the wheel — the ice lantern was assimilated into the holidays that dealt with the rebirth of the sun. The Winter Solstice is still a significant time for many who live in cold climates.
Happiness can be find in the simplest of things, and what’s more uplifting than seeing a bright flame dancing inside a beautiful ice sculpture as you walk up to a home? Even better? Leave out the candle and use it to keep your wine chilled when gathered with fellow frolickers around the firepit.
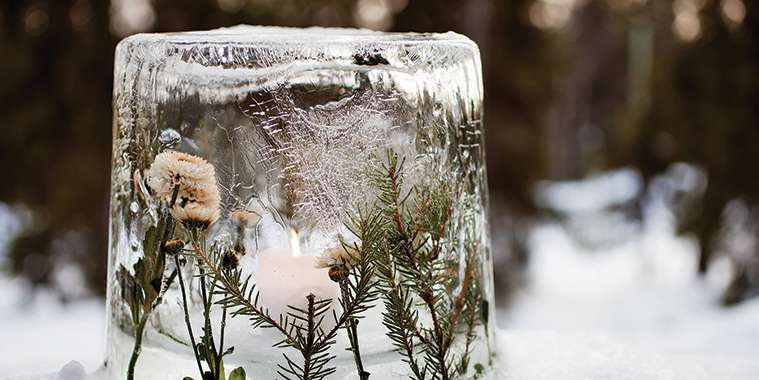
So what’s the science behind creating an ice lantern? When a container of water is put in freezing temperatures, the water inside starts to freeze when it reaches 32°F/0°C. When using a mold, the water toward the outside of the container is in direct contact with the freezing temperatures, so the water will freeze from the outside in. So after the ice lantern partially freezes, remove it from the mold and the water from the interior will flow out leaving behind a natural cavity, which is where the candle — or wine! — is placed for lighting.
Ice lantern creation is based on the chemical properties of water, and interestingly this is the only chemical substance that we regularly use in each of its three forms — water, ice and steam. The lines in the ice? Those are called “shooties”! The cause of the shooties is due to the makeup of the water. Pure water freezes first and pushes away impurities. For globe ice lanterns, that would push the impurities toward the center, away from the cold. So when tap water is used, the outside ice will be very clear and the inside of the globe ice lantern will have spikes of mineralized ice shooting toward the center. The colder the air, the more dramatic the effect. Colder than that, though, the ice will be more opaque. So warmer weather actually makes the water clearer!
Ice Luminaries
It’s super-easy and fun to make gorgerous ice lanterns with just some very basic chemistry, experimentation and a little patience. These lanterns can be very large, or small enough to set in the middle of a table. This is also a great family activity for all ages.
Supplies:
• Water
• Medium to large plastic containers or buckets
• Plastic cups
• Tea lights/pillar candles
• Optional: Evergreen sprigs and/or winter berries, food colouring or anything you fancy, from ribbons to small wooden shapes to birch bark or dried flowers, or even dried citrus slices (remember last week’s craft?) and cinnamon sticks
Instructions:
1. Fill your containers.
2. First, fill a small plastic cup with water and put it inside a larger plastic container. Fill the large plastic container with water. As an option, add evergreen sprigs and/or berries to the water to add some colour and texture. It helps to let the water freeze a bit so everything doesn’t float to the surface. Another fun option is to freeze the water in stages, 4” or 6” at a time while adding swirls of food colouring for a marble effect.
3. Carefully place the container inside a freezer or outside if temperatures are below freezing. Allow the water to freeze for several hours or overnight.
4. Unmold your lanterns. To do this, run warm water over the outside of the container. The ice might crack, but the cracks look beautiful against the candlelight.
5. Set your creations outside and insert tea light candles or pillar candles that will fit inside the space you created. (Never leave candles unattended.)
Tip: The size and shape of the lanterns are only limited by the containers you find. Try making two huge luminaries to flank a front door by using 5-gallon buckets and large pillar candles. Or make a dozen of them to line your sidewalk or driveway. It’s also possible to make ice lantern globes with a balloon. The possibilities are endless!