

Soooo, there are only six weeks until Christmas or Kwanzaa (or two until Hanukkah). Yes, I also just felt my stomach lurch with anxiety.
Like Thanksgiving, Christmas and other important family celebrations, like the just passed Diwali, looks like it’s going to be a “go” this year, unlike last year’s Grinch-y health restrictions canceling all gatherings. So we all need to start planning, and if you’re anything like me, you need some lead time. Shopping has been an ordeal since the start of the pandemic, and really, our values have changed quite a bit over that period, drifting more toward home and family.
I suggest hand crafting gifts for your special people. There’s a ton more meaning in that. People really appreciate the time you spent working on something specifically for them, and it’s something personal that they’ll cherish. Just make sure it doesn’t include black velvet and images of Elvis. But to each their own.
Six weeks is plenty of time to start making gifts, particularly if they’re not complicated. One craft that can involve the whole family and is super-easy but really fun is macramé. Plenty of kids have made those friendship bracelets out of string for their friends, so it’s not a big stretch to create macramé leaves. These are also called macramé feathers.
This is a great craft because it’s simple, it can be done with different colours of string, and if someone really doesn’t like it or have a use for it, it’s small enough to toss in a drawer. But I doubt that’s going to happen to this lovely little keepsake.
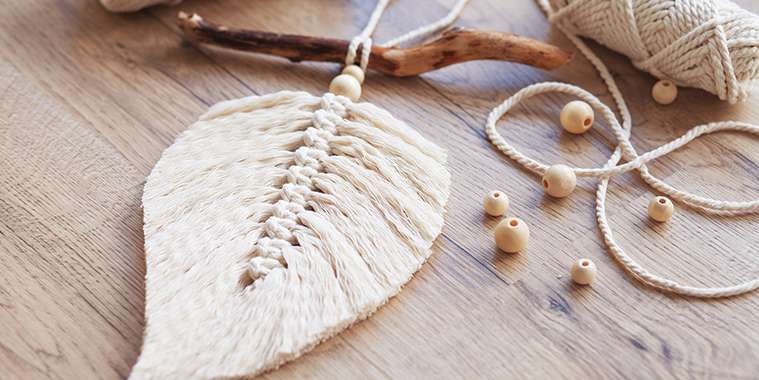
DIY Macramé Leaf or Feather
This easy craft is beautiful, nature-inspired, and the possibilities are endless. You can display a single leaf on a table with other precious items, turn it into a necklace, holiday decoration or bookmark, string a bunch together like a garland, or hang a few from a branch to cozy-up a bare wall above a table or bed. I’m thinking this would also make a pretty appliqué on a pillow, a tuque or a child’s sweater.
Supplies:
• 5mm single-twist cotton string
• Fabric stiffening spray
• Sharp fabric shears
• Cat or fine-wire brush (optional)
• Ruler
• Beads, branches, etc. (optional)
Instructions:
1. For a medium sized feather you’ll need a 32” strand for the spine, 10-12 14” strands for the top, 8-10 12” strands for the middle and 6-8 10” strands for the bottom. If you want the leaf or feather to be smaller, work with shorter strands, but not too short or you’ll have trouble tying the knots. Play around with the size and the colours of the string.
2. Fold the 32” strand in half. You can knot a bead or two up at the top at this point for added interest. Next, take one of the 14” strands, fold it in half and tuck it under the spine.
3. Take another 14” strand, fold it in half and insert it into the loop of the top horizontal strand. Pull it through and lay it horizontally, on top of the opposing strand.
4. Now pull the bottom strands all the way through the top loop. This is your basic macramé knot that you’re going to repeat all the way down the spine. It really doesn’t get easier than that!
5. Pull both sides tightly. On the next row, you’ll alternate the starting side. So if you laid the horizontal strand from left to right the first time, you’ll lay the horizontal strand from right to left next.
6. Lay the first folded strand under the spine and thread another folded strand into its loop. Pull the lower strands through the top loop and tighten.
7. Keep going and work gradually down in size. So when you’ve used up all the 14” strands, start using the 12” strands and then the 10” strands.
8. Be sure to push the strands up to tighten as you work your way down. Grab the bottom of the middle (spine) strand with one hand and with another, push the strands up. It’s helpful to use a pin to secure the top of the spine to something that doesn’t move. This allows for even tension on the spine as you make your knots. When you have about 2” of the spine left at the bottom, you can stop.
8. Drag all the strands downward to meet the end of the spine and give it a rough trim. This not only helps guide the shape but also helps with brushing the strands out, if you want a feathery effect. Or you can leave the string untouched which looks more leaf-like and rustic, and is less messy to make!
9. Starting at the spine, push hard into the string and brush outward. It’ll take a few hard strokes to get a soft fringe. Be sure to protect the surface on which you’re brushing with a self-healing cutting mat or cardboard because the brush will cause scratches.
10. Brush all the way down and be careful at the bottom so you don’t start pulling knotted strands off the end.
11. Set the shape (so it doesn’t flop if you plan to hang it, with fabric thickening spray. You can also use strong-hold hairspray if you’re in a pinch. Once it’s set, trim to the final shape.
There are plenty of great tutorials on YouTube, but if you prefer time to really study the technique, I suggest visiting honestlywtf.com for excellent step-by-step instructions with photos on how to make this craft.
Try it! You’ll be surprised at just how easy it is, not to mention stress-relieving — something we all need more of these days.