

Growing your own microgreens at home is an easy way to add variety to a healthy diet, along with being a fun project that the whole family can enjoy together. Kids will love the miniature garden aspect of this! Best of all, it’s something that can be done economically year-round, which in our long winters comes in very handy.
What are microgreens?
Everyone knows what sprouts are. We see them everywhere. Microgreens are basically sprout’s sophisticated older cousins. While sprouts are grown without a growing medium (like soil) and are eaten roots and all, microgreens are cultivated in a growing medium and are trimmed at the base before eating.
Microgreens are harvested when they’re a couple of weeks old and have developed their first set of true leaves. Sprouts, on the other hand, are eaten just as their cotyledons — the first set of leaves that emerge from the seed — become green. Microgreens take a little longer to grow than sprouts but are actually lower-maintenance.
Microgreens are considered a superfood and radically outperform their mature counterparts in antioxidants. A recent study clocked the nutritional value of microgreens at four to forty times that of their mature versions! Due to their fragility and short shelf-life, these yummy treats are typically reserved as garnishes in high-end restaurants. However, because they’re easy to grow and require little space, they’re a natural choice to grow year-round at home.
Why grow your own microgreens?
There are so many reasons to grow microgreens at home, but the primary reasons are:
• Easy to grow in a limited amount of space
• Quick turnaround — even if a crop fails, little time and resource will have been lost, and starting over is simple
• An economical way to have a continuous supply of fresh, highly nutritious greens at home
• A great introduction to gardening for beginners
• No outdoor climate restrictions
• Incredibly healthy, living food to supplement a healthy diet
• Versatile — add them to anything, from salads to sandwiches, for a delicious and healthy crunch.
What can be grown as a microgreen?
While the microgreens seen in grocery stores are limited to those with a longer shelf-life, the range of plants that can be grown as microgreens is vast. Commonly grown microgreens include salad greens, leafy vegetables, edible flowers, herbs and even some root vegetables.
Large microgreens
Large microgreens are very easy to grow but plant density is a bit lower because of the larger seed size.
These varieties include adzuki, barley, beets, buckwheat, chard, chickpea, cilantro, collard greens, dill, endive, fava bean, fennel, kale, kohlrabi, lentils, lovage, mung beans, parsley, pea, sunflower and wheatgrass. They can do with a pre-soak before harvesting.
Medium microgreens
Medium microgreens are simple to grow and many of their seeds benefit from a presoak, although it isn’t necessary unless specified. They have a higher plant density per tray than larger microgreens.
These varieties include arugula, basil, broccoli, brussels sprouts, pak choi, cabbage, cauliflower, chia, chives, fenugreek, flax, leek, lettuce, mache, mustard, orach, parsley, radish, sesame, shiso, sorrel, spinach and turnip.
Small microgreens
These tiny varieties are a little more challenging to grow because of the difficulty in sowing the small seeds evenly across the planting medium. But they will form a very dense mat of plants and are packed with intense flavour.
These varieties include alfalfa, amaranth, celery, lemon balm, marjoram, mint, oregano, purslane, sage, tarragon and thyme.
Sourcing seeds for microgreens
Not all seeds are created equal. Many commercially-produced seeds are treated with fungicides or pesticides, making them unsuitable for microgreen growing.
The ideal seed for microgreens come from organic seed producers. The volume of seeds needed for continuous microgreen production is higher than for gardeners growing just a few plants to full size, so always look into seeds sold by the ounce, which are far less expensive and will go a lot farther when you are planting crops every few weeks. A great source for organic seeds can be found at sprouting.com with free shipping on orders over $40.
Step-by-step growing
Getting started is easy and requires minimal supplies, some of which are free — like sunlight.
Supplies
• Growing trays: You can start out using the plastic clamshells that produce or takeout food come in — which is a great way to reuse those non-recyclables! — but for long-term growing, sturdy plastic trays with drainage holes are best. An inch deep tray is all you need.
• Growing medium: One of the most important decisions to make is what type of growing medium to use. Some growers swear by potting soil, others prefer soilless medium, like coconut coir. It’s a good idea to experiment and find what works best for you.
• Certified organic seeds: Using certified organic seeds is the safest and healthiest option. Buying in bulk keeps costs down, but try a few before going all-in on a large volume of seed.
• Grow light: If you don’t have good indoor light, there are many affordable lighting options out there. A good 30-watt LED set-up will cast plenty of light. In fact, moderate light will grow exceptional microgreens. A sunny, south-facing window is a great place to start growing microgreens, but 4-8 hours of direct light per day is necessary.
• Spray bottle or watering can: To spritz or not to spritz? Believe it or not, spritzing seedlings is preferred by some and discouraged by others who prefer using a watering can to water from below. Every set-up is different and takes trial and error to get right.
• Labeling materials and notebook: Record-keeping helps you keep track of what worked and what didn’t, and understanding germination rates are extremely helpful tools if this becomes a long-term endeavor.
Instructions
1. Find a location with good light. Make sure that the surface is protected from any water overflow.
2. Prepare your trays. If you’re re-using a container, make sure it’s disinfected and dry. Fill trays with an inch of moist (but not wet) growing medium and make the soil level.
3. Prepare and plant your seeds. Seeds that benefit from soaking (usually larger seeds or seeds or seeds with a very hard hull) should be soaked overnight or for a few hours before planting. Spread seeds evenly over the entire surface of the soil, and sprinkle a little bit of soil over them.
4. Press the seeds into the soil. This helps the seeds establish good soil contact, allowing them to absorb more moisture.
5. Cover and wait. If you don’t have covers, you can use a plastic bag or plastic wrap to encourage germination.
6. Water as needed. Trays on a windowsill or in open air will need to be misted at least once a day with a spray bottle. It’s important to keep the seeds moist, but not wet, until they germinate. Once the seeds have sprouted, spraying once or twice a day is best.
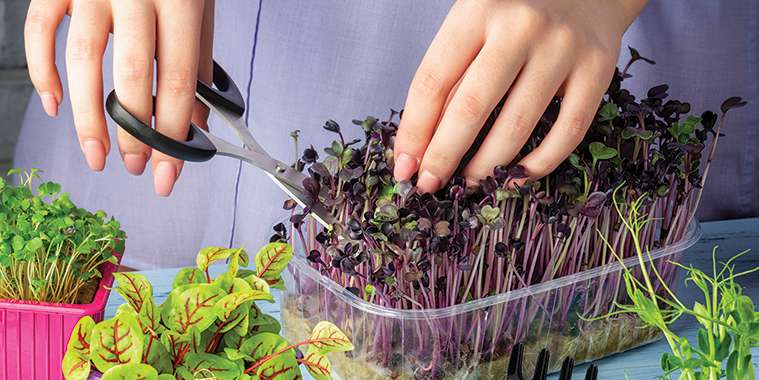
7. Harvest and enjoy! Once the microgreens are a few inches high and have developed a set of true leaves, they’re ready to harvest. Using sharp scissors, cut the stems just above the soil line. If you need to rinse them, do it gently and then dry them in a salad spinner or on a paper towel.
Still not motivated? Check out freshforage.ca, a local producer in Winnipeg, or sweetprairiegreens.ca and buy fresh from the source.