

By David Square
And that simplest Lute, Placed length-ways in the clasping casement, hark!
—Samuel Taylor Coleridge, “The Eolian Harp” (1795)
In a past column, I showed how to build an outdoor harp that sings when placed in an open location where Aeolian gusts can pluck its strings.
With the misty month of October and ghostly Halloween on the horizon, the eerie, otherworldly sound of a window sill harp is an appropriate DIY project because it can be played indoors, safe from elements and goblins and hauntingly beautiful to you.
As the name suggests, a window sill harp is set on a sill with the window ajar to allow outside air to flow over the strings, creating sounds rare to the
human ear.
To build a DIY window sill harp you will require:
• Three square feet by 3/8-inch curly maple, half-square foot 3/8-inch spruce
• Six guitar strings (Ernie Ball electric super-slinky, Long and McQuade)
• 15-inches by ¼-inch and 6-inches by 3/16-inch aluminum rod
• Drill press, table saw, 2 1/4-inch hole saw, hacksaw or angle grinder
• Palm or orbital oscillating sander, router
• Clamps, yellow glue
Begin by ripping maple to create three pieces by 14-inches by 3 ¼-inches, two pieces 3 ¼-inches by 2-inches.
Mitre the ends of the pieces, adding a loose mortise and tenon for easy alignment when clamping and increased joint strength. Use yellow glue to assemble the mortises.
The joined pieces form a rectangular box that is the resonance chamber of the harp, similar to the sound box of an acoustic guitar.
Use a 1/4-inch bit to cut a 3/8-inch deep rabbet in the box’s sides to receive the bottom, which will require trimming to fit neatly inside the rabbet. Clamp and glue the bottom into position.
Before attaching the 3/8-inch spruce sound board to the top edges of the sound box, reinforce the inside of either end by gluing an approximately two-inch by 1 ¾-inch by ¾-inch hardwood scrap to each piece. The reinforcers will support the pins for the guitar strings.
Glue the 14-inch by 3 1/4-inch spruce sound board to the top edges of the box. When the adhesive has set, mark a centre point in the middle of the spruce board, 7-inches from one end and about 1 5/8-inches from one side. Use a 2 ¼-inch hole saw to drill a sound hole at this point.
Now strike a line across the face of the sound board ¾-inch from each end. Leaving a ¼-inch space at one edge, mark six points 3/8-inch OC. There should be a ¼-inch space leftover when the marks are completed. Repeat at the opposite end.
The points indicate the holes where the string pegs will be seated. To help prevent wood tear out, use the tip of a slightly smaller drill to create a pilot hole. Cover the marks with masking tape and then use the full-size drill (1/4-inch) to finish the hole to final depth, about 1-inch. Carefully peel off the masking tape, leaving a hole with a clean circumference.
Use aluminum rod (available from Metal Supermarket in Winnipeg) to make the pegs. Aluminum cuts easily with a hack saw or angle grinder and can be drilled with a 3/32-inch bit on a press. Remove burrs with a grinder. (Flatten the side you are drilling. This prevents the bit from skating across the rounded rod.)
You require nine pins about 1 ½-inch long with 3/32-inch hole drilled about ¼-inch from the top. Peg holes should be drilled 1-inch deep to ensure they will not bend when the strings are tightened. Three of the tuning pegs must be ½-inch longer to allow room for tuning with toothless pliers.
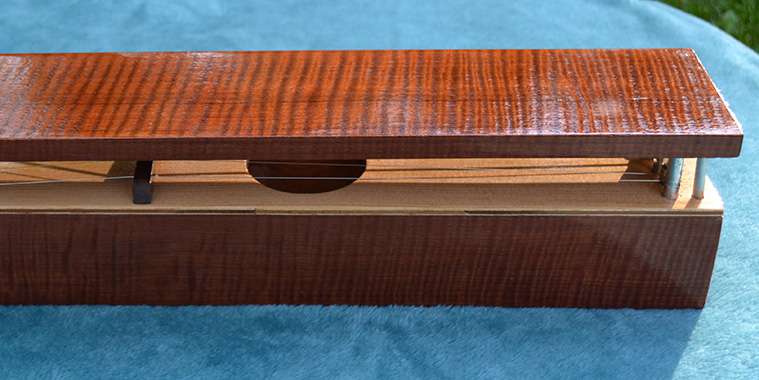
At each corner of the spruce top, four other holes by 3/16-inch by 1/4-inch deep are needed to support the third piece of 14-inch by 3 ¼-inch maple, which sits like a canopy over the strings to funnel more air over them and amplify their sound. The canopy also requires four similar holes at each corner.
Cut four pieces of 3/16-inch aluminum rod by 1 ½-inch long. They should fit snugly into all the holes. If you choose, the rods can be glued permanently into position with five-minute epoxy or left unglued so the pins and cover can be removed to allow a better view of the stringed harp.
To adjust the height of the strings, I cut and shaped a bridge from a scrap of figured black walnut. It was easy to cut out on the band saw and to shape with sanding drums (available from Lee Valley).
davidsquare81@yahoo.com