

By David Square
If you are interested in adding a pen and ink flair to some of your DIY wood projects, you should know this secret: Ink can be applied to wood without bleeding into the grain if the surface is properly prepared in advance.
Apply two coats of white shellac to a fine-pored, tight-grained wood like maple, birch, cherry or satin walnut, sanding the second coat smooth with #320 to #400 wet/dry paper.
If you use prepared shellac from a paint store, it is a good idea to add a dollop of methyl hydrate to thin the mixture; otherwise, the second coat may have a gummy consistency which is difficult to sand and may clog the nib of your drawing pen.
Prepare some 4” x 4” x ½” samples of each wood you will be drawing on. The wood should be sanded to #120 to allow the shellac to penetrate the surface. Further sanding with finer paper will polish the surface, creating a mill-like glaze preventing the shellac from penetrating the surface as well as beading the ink.
My wife Penny, the artist in the family, experimented with different shellac solutions and inks until she perfected her drawing technique. As a rule of thumb, two light coats of shellac are preferable to two thicker coats; her ink of choice is Pelikan.
For black details, Pelikan schwarz 4001 flows well and is forgiving; mistakes can be removed with a damp cotton tip before the ink dries. Pelikan’s Edelstein collection includes an array of deep, dazzling colours that have the same desirable working characteristics as the 4001 black. (Check Amazon.ca for Pelikan products at Canadian prices.)
For the most part, Penny draws with an ultra-fine nib set in a dip pen holder (5” long by ¼” round). Worn out nibs are replaceable; larger nibs can be purchased to fit a bigger dip pen holder. (Most refillable fountain pens are equipped with nibs that are too large for fine ink drawings.) To cover large areas with ink, she uses a high-quality 20/0 artist’s brush available from Artists Emporium in Winnipeg.
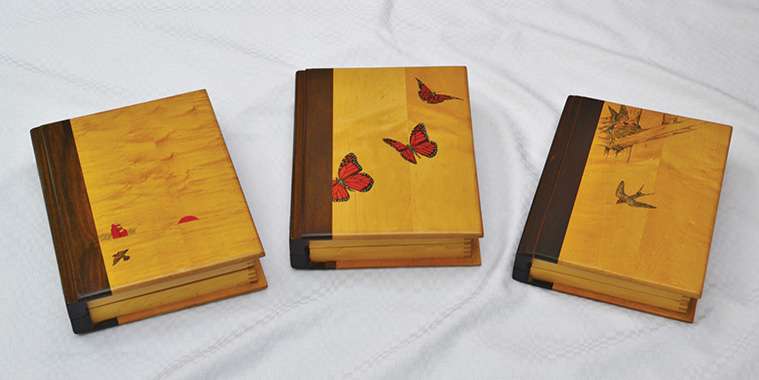
Penny’s art consists of prairie landscapes or Manitoba flora and fauna, including grain elevators, old farm buildings, maple and oak trees, swallows, red-winged blackbirds, Canada geese, loons, monarch butterflies and much more.
One of her favourite woods is satin walnut (prosaically known as American red gum) as its unique figure is composed of light-brown to a deeper red-brown, including darker streaks that look like clouds or horizon lines.
Hard maple is another desirable wood, especially when it has a mottled or curled figure that can be incorporated into Penny’s ink on wood pieces.
The examples of Penny’s art shown in the accompanying pictures are ink on hard maple. In this case, her delightful drawings add a prairie touch to a series of book boxes I made for customers who desired a special case in which to store a book by a Manitoba author.
To seal the drawings, use three coats of oil-based rubbing varnish, polishing between layers with #600 wet/dry paper. Rub out the final coat with #0000 extra-fine steel wool and finish by buffing the surface by hand with a soft cloth or with a lamb’s wool bonnet attached to a drill.
As I have discussed how-to-construct a book box in a previous article, I will briefly go over the main details.
Join two pieces of ¼” thick hard maple to form the front and two similar pieces to create the bottom of the box. Add a 1” wide x ¼” thick piece of contrasting wood (in this case padauk) to an edge of both the top and bottom to create the illusion of a spine.
Finger joint two corners of the ½” thick sides of the box and cut tenons into the upper and lower sides to fit in to mortises in the back spine, which is a 2 ¼” wide x 1” thick length of padauk.
Mortise hinges to the solid padauk spine and shape the completed box to resemble a book.
Now feel free to let your artistic expression flow.
davidsquare81@yahoo.com