

Part One of Three
Elvis “The King” played a Framus guitar back in the late 50s when he became the catalyst for the rock and roll phenomenon that was heard around the world.
Despite the link to Elvis, Framus electric guitars never became as renowned in the R&R world as the Fender Stratocaster or the Gibson Les Paul. However, Bavarian-based Framus Werkes did build a “Hollywood” series of electric guitars in the late 1950s and early 60s which were revered by blues, jazz and rock musicians alike.
I’ve included this info about Framus because this column is about how to refurbish an electric guitar; in this case, a Framus F5-130 Hollywood manufactured in 1961, according to a partially smudged serial number on a piece of paper glued to the inside of the guitar.
I purchased the guitar in used condition when I was a member of a teenage garage band known as Ferris Wilde’s Childes. After my short music career ended, I carelessly stored the lead axe in a grain bin which did not leak at the time.
In mid-March this year, I was cleaning out the bin when I discovered the Framus propped in a corner. The elements had created a hole in the roof above, exposing the beleaguered guitar to rain and snow melt. The original red to gold “sunburst” lacquer finish was almost stripped off, the head was unglued, the bridge was missing, the tuning screws were rusted beyond use; worst of all, the veneer on the body was peeling off in sheets.
I could not throw out the Framus because there were too many pleasant youthful memories attached to it. And so, in the spirit of John Jerome’s 1977 classic book Truck, I decided to reincarnate the neglected, forsaken soul of my teenage years — my goal was not to rebuild the Framus to factory condition, but to make it playable once again.
Anyone with a few basic hand and power tools can refurbish an electric guitar. Many bodies are simply band sawn from a solid maple slab with a few mortises to receive the pickup(s), volume/tone controls (pots) and the neck. That being said, there are slightly more challenging hollow and semi-hollow models that reduce the weight of a slab guitar and increase an instrument’s resonance.
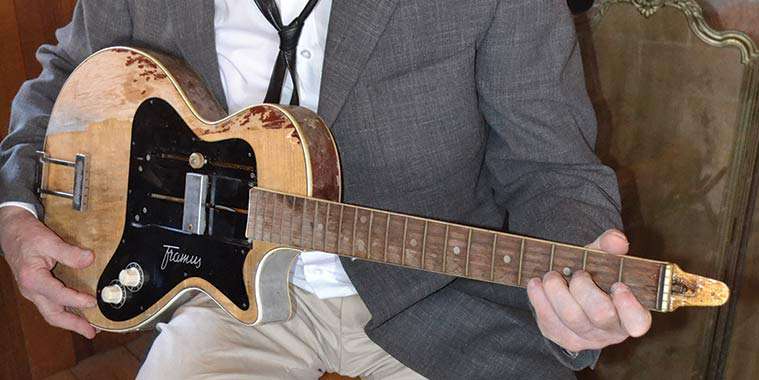
My Framus is a semi-hollow guitar. The body’s top and bottom are composed of thin Baltic birch plywood veneered with maple; the sides are 5/8-inch thick veneered hardwood. There is a large wood block inside the body to support the bridge and another to support the neck. The instrument’s most curious feature is a single, sliding pick-up that can be adjusted from the neck to the bridge by moving a knob located above the strings on the guitar’s metal face plate.
I began to refurbish the Framus by tightening the truss nut that straightens a concave neck by applying pressure to a metal rod located inside the length of the neck. Many guitars (Framus included) have a removable plate attached to the head just above the fret board that allows access to the truss nut. However, on some models the nut is placed at the base of the neck. (Never tighten the nut more than ¼-turn at one time, allowing the neck several days to adjust to the increased tension. Loosening the bolt will straighten a convex neck.)
Next, I stripped the veneer from the body’s top, back and sides with a two-inch putty knife. In some spots, where water had not already lifted the veneer, I used a hairdryer to soften the hide glue that still held the finish in place.
I then removed a layer of gold spray paint from the back of the solid maple neck and head with lacquer thinner and #120 sand paper. (Some unnamed wanna-be guitarist had added this touch of colour in the past.)
The critical joint where the neck attaches to the body was still solid thanks to the guitar’s designers and builders, who also created stringed instruments like violins, cellos and double basses.
Unfortunately, the original Framus symbol mortised into the head’s face and was beyond saving. To remedy the problem, I traced the shape of the head onto a 1/8-inch piece of walnut, cut the shape out on my band saw and clamped it to the head’s face, using Titebond III glue (more on this later).
Though the rosewood fret board had some water stains, these were not a problem as the wood is extremely resistant to rot and water damage. I removed the stains by sanding between frets, starting with #220 wet/dry and finishing with #600 wet/dry.
I was not sure whether to replace the frets or to leave them alone. A luthier friend told me to stick with the originals, unless they were chipped or worn to the point where the strings hit the fret board before the frets. As the Framus’s frets showed none of this wear, I chose not replace them.
In Part Two, I will demonstrate how to re-veneer a guitar with contact cement, not, ugh, hot hide glue.