

When my daughter asked me to build a Dungeons and Dragons dice box for her boyfriend, I agreed. I mean, how difficult could it be to create a container for seven oddly-shaped dice?
In my case, it proved more challenging than
anticipated because I decided to use a 1½-inch- square by 12-inch-long turning blank of rough wenge to build the container. However, the machined dimension was only 13/8-inch-square, a tad small for a dice box as I found out.
The design I choose was a variation of a mass produced box that I viewed on Etsy. I decided the container’s top was disproportionately thick in relation to the box’s body, so I decreased the thickness of my top to ½-inch versus about ¾-inch on the Etsy container.
Materials and tools required:
Machined (not rough) 1¾-inch-square by 12-inch-long hardwood blank such as maple, oak, cherry, walnut, wenge; do not use softwood as the fibres do not cut cleanly when drilled.
Four pieces ¼-inch by ¼-inch rare earth magnets
Two hinges (I bought a lovely pair of filigree hinges from Lee Valley for about $5)
1-inch Forstner bit, power drill, drill press, band or table-saw, set of twist drill bits, marking gauge, awl, sandpaper, oil finish, epoxy, spray adhesive
Start by ripping a ½-inch thick piece of wood from your square block. This will be the top of the dice box; the other piece, about 1¼-inch thick, minus the saw’s kerf, will be the bottom. For a seamless-looking container, keep the figure of the wood’s top and bottom aligned.
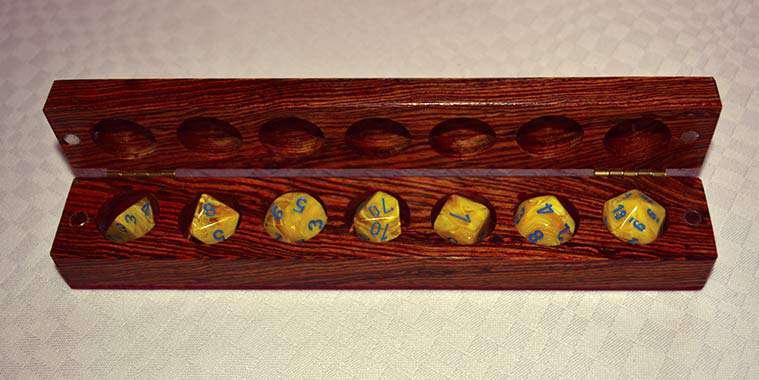
Use a marking gauge to incise a line down the centre of the top’s downward face and the box’s upward face. Start with the top and measure ¾-inch from one end, striking a pencil mark on the scribed center line. From the pencil point, measure over ¾-inches and use the awl to create a small point in the wood on the center line. From this point, continue to mark points along the scribed incision every 1½-inches until you have seven awl points and sufficient room leftover to allow for a ¾-inch overhang at the end of the blank. The total length of the box should be 10¼-inches, including ¾-inches at either end. Repeat the same procedure on the upward face of the bottom of the blank.
Align the brad point of the 1-inch Forstner bit with the first of the awl marks on the box’s top and drill seven holes about 3/8 inches deep, being careful not to allow the brad from puncturing the container’s face. Repeat the procedure on the bottom, this time drilling each hole about 7/8-inches deep. (I used a 7/8-inch Forstner which resulted in a very tight fit for the bigger dice. Another problem was I could not drill holes deep enough into the bottom to accommodate the depth of the bigger dice because my bottom blank was only ¾-inch thick. The result was the brad punctured the bottom in a couple of places. As a remedy, I glued an 1/8-inch piece of padauk (I was out of wenge) over the bottom to hide the holes. Though padauk is blood red when first sawn, it darkens to a rich brown over time, as does wenge, so I was pleased with the result.
Now, place the seven dice in each hole in the box’s bottom and fit the top over the dice to ensure the holes align and the container closes tightly. For the bigger dice, you may have to drill deeper holes into the bottom to prevent them from holding up the lid.
To remove the lines and flatten the box’s interior faces, run the wood back and forth across a sheet of #80 and then #120 garnet paper, glued to melamine or another flat surface like a piece of plate glass. 3M’s #77 spray adhesive holds sandpaper sheets in place and, if the spray is lightly applied, the sheets can be peeled off after use.
Drill four ¼-inch holes ½-inch from the end of the container’s interior faces and on centre with the container. Epoxy four rare earth magnets into the holes, ensuring the magnets have opposing
polarities. The magnets have sufficient strength to hold the box’s top and bottom firmly together, but not so much as to require a pry bar to open it.
Attach the hinges to the container. The filigree ones that I used came with escutcheon pins (brads) that required a 1/32-inch pilot hole to prevent them from bending as I tapped them carefully into the dense wenge.
Finally, lightly chamfer all edges of the box to prevent slivers.
Most wenge aficionados use three coats of tung oil, buffed between coats with a soft cloth, to finish the wood. Lee Valley also sells a polymerized tung oil that dries faster and has a more durable finish than other products.
Whatever finish you choose, have fun rolling your dice.