

In the final part of this series, I will show how to finish the sides, back and roof of the Little Free Library. For parts one and two, please see the links below.
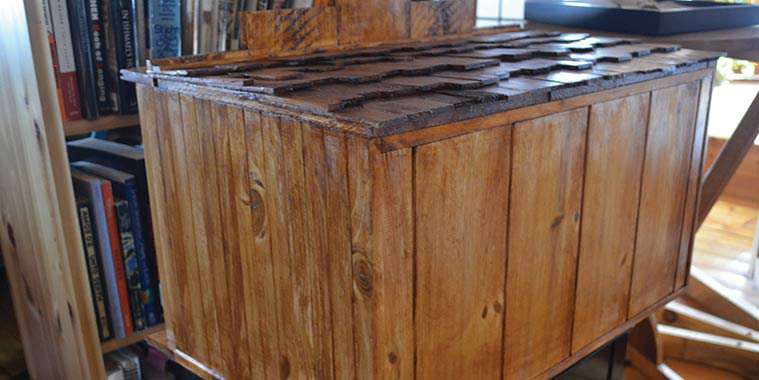
To cover the plywood sides, rip about 20 pieces of 1-inch-wide strips of spruce/pine from ¾-inch T&G stock. Chamfer the edges with a router or by holding the pieces against a belt sander sitting on its side.
Attach the siding vertically to the library’s sides with 1 1/4-inch finishing nails or a pneumatic brad nailer, using six nails per piece, two at the top, two in the middle and two at the bottom. If your library will be set up out of doors, run a small bead of waterproof glue down the middle of each length of siding before attaching it. The tops and bottoms should sit flush with the roof and base of the carcass.
To finish the back elevation, use approximately 4 ½ pieces of full width T&G glued and nailed vertically to the plywood as per the siding.
Before you begin to shake the roof, brush a layer of N.I.S. cement over the plywood and place either roll roofing or asphalt shingles (mineral side up) on top of the cement. The asphalt material should overlap the top edges of the siding and overhang the back edge of the roof by ½-inch. Use a few ½-inch roofing nails to hold the material in position; cover the nail heads with a dab of black shingling cement.
In Part one, I estimated four packages of pine/cedar wood shims would be more than sufficient to shake the roof. However, I now suggest a minimum of eight packages to cover a 25-inch by 12-inch roof.
Start roofing by overhanging a full shake (1 ¼-inch by 5-inch wood shim) about 1/8-inch from the edge of the asphalt underlay at the bottom left edge of the roof. The first shake should also overhang the underlay along the roof’s rake edge 1/8-inch. Use a bead of waterproof glue and two ½-inch pneumatic brads or two finishing nails to secure the shake. Continue by placing and securing shims side by side along the bottom edge until you reach the opposite side of the roof. You will likely have to rip the last shake to fit. (I kept my nailing line straight by drawing a pencil line on top of and perpendicular to the shakes about 2 ½-inches from the bottom edge of the first shim. Start the second course by ripping a shim in half and placing it so that its leading edge covers the nails and it covers one half of the first shake. Draw a nailing line as before, and continue to lay the shakes in an offset pattern, with some longer and others shorter in relation to each other. This staggered pattern is a prominent and pleasing aspect of a shake roof. Continue until the back edges of the shakes butt up against the back of the false front. (My final layer of shims varied from about 3-inches to 1 ¾-inches long.) Cover the top edges of the final course with a ½-inch-wide by 1/8-inch-thick by 24-inch capping board. Flush the board to the back edge of the false front, then nail and glue it perpendicular to the last row of shims, filling the nail/bard holes with a suitable wood putty.
To stain your library, use a gel stain like Varathane’s Ipswich Pine to get the deepest penetration into the wood. (Gel stains can be brushed on and wiped off with a clean cloth several times, depending on how dark a finish you require. They have an advantage over liquid stains in that they do not drool.)
Allow 24-hours drying time between coats of stain. When you are satisfied with the colour, apply three coats of outdoor/indoor polyurethane, sanding with #400-wet/dry paper between coats to achieve a silky-smooth final finish.
To erect the library out-of-doors, use an 8-inch auger to drill a hole about 3-feet deep in a suitable location. Attach a brown treated 4-inch by 4-inch post to the bottom of the library, using at least two angle braces to add support to the post and library on top. Drop the post into the hole and fill with ¾-inch-down or with a variety of concrete mixtures available at big box stores. (Buy three 60-lb bags of concrete.)
My wife Penny used a calligraphy pen to create a Little Free Library sign out of pine that is screwed to the mid-section of the false front. To prevent the ink from running into the wood’s grain, seal the pine with a coat of polyurethane. After the calligraphy is completed, seal the ink with three overcoats of polyurethane.
Now sit back and enjoy watching your curious neighbours first explore and then use the new neighbourhood treasure.