

Many of today’s homes are equipped with medium-to high-efficiency natural gas or propane furnaces that are 80% to 90% efficient.
However, to operate at specified manufacturer efficiency ratings, furnaces must be properly maintained by the homeowner or a reputable service company.
DIYers can save money on service calls and keep their furnaces performing at optimal output by following this checklist:
1. Check the main gas line (usually a copper pipe) entering the furnace for corrosion. If you smell gas, pinhole leaks can be located by brushing a solution of water and dish detergent along the pipe. Tiny soap bubbles will appear at the sight of a leak. At the same time, check the shut off valve (if installed) that is attached to the copper gas pipe near the entrance to the furnace. Turn the valve’s handle so it is in line with the pipe to open the valve. Brush soap solution over the valve and connectors to check for leaks. (Phone a qualified gas fitter to fix leaks; otherwise, your house insurance may be voided.)
2. Remove the furnace’s compartment door. Some doors are held in position with a few sheet screws while others are friction fitted. In most models, a safety switch will close when the door is taken off, preventing the furnace from starting accidentally. Most furnaces will also have a standard 110V wall switch screwed to the outside of the furnace or located on a wall near to the furnace. Turn this switch off as well.
3. If not already in the off position, turn the interior gas valve to off by rotating it a half turn or until the word “off” lines up with a line scribed into the body of the valve. For additional safety, you can also turn the outside valve discussed above to the off position.
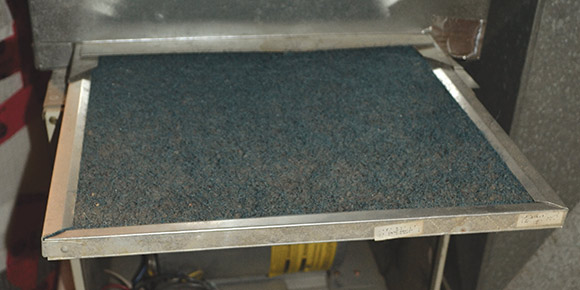
4. With the compartment door removed, the interior of your furnace will look like a tangle of wires and condensation tubes leading to and from motors, fans and other components which are the operational parts of the unit. Before you further consider this dazzling display of electronic and mechanical ingenuity, locate the furnace’s air filter or filters. My 80,000 BTU Carrier furnace has a standard 14-inch-by-25 inch filter that slides into a metal slot above the main blower. Depending on the BTU rating of your furnace, your filter will likely range in size from 14-inch-by-25-inch to a 25-inch-by-25-inch; very large furnaces may require up to 30-inch-by-30-inch filters.
5. In many cases, your filter will be constructed of blue or white fibreglass about one-inch-thick with a cardboard frame. The size will be printed on the frame. The filter will either slide out of the furnace on metal rails or will sit on metal tabs that allow it to be lifted out of the furnace compartment. Pleated paper and polyester filters are also common, but like fibreglass ones they are throw away items that clog landfills. Though more expensive initially, permanent reusable filters are an investment in the environment as well as a more economically viable choice, because they can be washed with water and vacuumed and have a lifespan of five years or more. (I have this type of filter in my furnace. It has a metal frame and a green polymer mesh that is an effective dust and pollutant collector.) In peak heating season, filters should be cleaned or replaced every three weeks.
6. Before you purchase a new filter(s), consider its Minimum Efficiency Reporting Value (MERV) rating, a fancy term for the tightness of the filter’s weave and the amount of dust and other particulates it will remove. MERV ratings are from 1 to 16, with the lower number removing the least dust and the higher the most. For most household furnaces, a filter with a MERV rating of eight to 11 will suffice. Any filter rated beyond 11, may cause your furnace to work harder and cut out due to overheating; a lower rating will not remove a sufficient amount of dust, etc. If you are a smoker or a pet owner, consider installing a hydrostatic filter that is designed to attract and trap smoke fumes and hair more efficiently than a regular one.
7. Once you have removed the filter from your furnace, place it inside a bag so it does not leave a trail of dust and dirt inside your house when you take it outside for disposal, or, in the case of a reusable filter, wash and vacuum it for reuse. At the same time, use a vacuum to carefully remove dust and other debris from fans and other components inside the furnace compartment.
8. Install your new filter(s). Most filters have arrows printed on them to indicate air flow direction. If in doubt, call a service representative for your make of furnace.
9. Now, with the help of a flashlight or trouble light, you can inspect your furnace’s wiring. The main electric control board can be identified by a mass of colour coded wires that originate at the control and run from it to all the electrical components of your furnace.
10. Run your fingers along wires to check for cracked insulation or breaks. Check to ensure all connections at the main board and components are tight. Most of the connectors are vinyl insulated female disconnect that can be removed and replaced without crimping tools. If you are experienced with wiring, replace damaged wires and connectors with manufacturer recommended products.
11. Check for leaks in the flexible tubes that remove condensation, a by-product of gas combustion. A broken or bent tube can cause one of the redundant safety sensors in your furnace to prevent it from lighting. As with wires, replace tubes and clamps with manufacturer parts.
12. Finally, if your furnace does not ignite, remove and clean a metal rod called the flame sensor. The top of the sensor looks like a spark plug and is attached to the furnace burner box by one or two 8 mm, hex-head, sheet-metal screws. A white (usually) wire will be connected to the male prong at the top of the sensor with a female connector. Pull the connector firmly apart to remove the wire and then undo the screws. Gently pull the sensor out of the burner box. It will be either a straight rod or an ell shaped one. Clean it with a mild abrasive such as Scotch-Brite. Reinstall the sensor and advance your thermostat to the “call for heat” position. If your furnace does not ignite, it is time to call a heating professional or, perhaps, Saul.
davidsquare81@yahoo.com