

After reading Bram Stoker’s Dracula, I was terrified of bats. To alleviate my phobia, I researched an article about bats in the Encyclopedia Britannica. (If you are old enough, you may remember encyclopedias.) The information I gleaned was reassuring about the relationship between Homo sapiens and Chiroptera, the scientific name for 1,200 species of bats. According to the article, much hyperbole has been penned about the little mammals becoming entangled in hair, biting pets and so forth.
In Manitoba, for example, the most predominate member of Chiroptera is the little brown bat, a shy, gentle creature that consumes 6,000 to 8,000 insects each night, many of them mosquitoes!
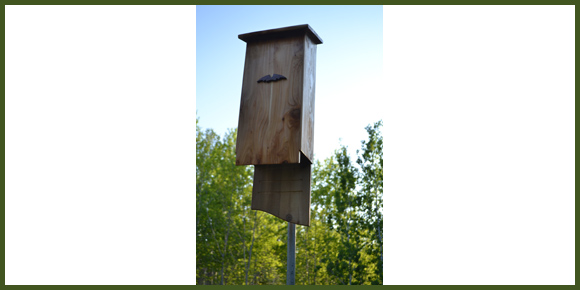
I wondered how to attract these voracious little bats into my backyard. The answer: build a DIY bat house.
A bat house can be as simple or as complicated as you want to make it. For a basic design, you will require:
Wood
• 1 pc. 12” x 8’ by 3/8” sheathing plywood
• 4 pcs. 1” x 6” by 6’ re-sawn cedar fence boards
Other materials:
• 24 steel, brass or coated #6 x 1” deck screws
• 3 pcs. 6’ x 1” ID threaded iron pipe, 3” nipple, 90-degree elbow, 2 couplings, 4” to 5” floor flange.
• Caulking, paint, two-part epoxy
•¼” or ¾” down
Tools: Skill saw, dado set or router, chop saw (if available), jig saw, drill/countersink, clamps
Begin construction by joining with epoxy two pieces of 32” x 1” x 6” cedar and two pieces of 22” x 1” x 6” of the same material. The former will be used as the back of the house and the latter as the front. Next, cut two pieces of 22”x 1” x 6” cedar to form the sides of the enclosure. The top edges of the back and front of the box should be bevelled at 20-degrees and the top edges of the sides mitred at the same angle, which will create the slope for the structure’s shed roof.
Keep the rough side of all boards to the inside to allow the bats to cling to the wood as they climb into the house. If your boards are not rough, cut kerf lines every 1” at right angles to the edges to facilitate climbing. A chop saw is the best tool for this job; however, a router with a 1/4” bit will do the job. Keep the kerfs to the middle section of the boards to prevent air leakage when the box is completed.
Cut a rabbet joint down the long edge of each side piece to receive the back and front of the enclosure. A dado set or a router will ensure an accurate cut. Now, rip three kerfs about ¾” apart down
the interiors of the sides to accept four plywood dividers. If the ply is smooth, use the same technique as mentioned to roughen all faces. The length of the roost partitions can vary; mine are from 15” to 21”. When done, bevel the top of each divider at
20-degrees to match the roof angle of the box’s outer walls.
Finally, cut a long ¾” wide slot in each divider to let the bats move between compartments. Drill ¾” holes about 1 ½” from the top and bottom of each partition, then remove the remaining wood with a jig saw. The slots should be staggered. (As a rule, bat houses should have ¾” to a maximum of 1” openings to prevent other critters from crawling inside.)
Before final glue up, dry fit all the pieces together to ensure you will not encounter a mistake when the epoxy is mixed and beginning to set. When you are prepared, glue the partitions into position and secure them with small brads driven from the outside of the box. Use a countersink and drill bit attachment for #6 screws to predrill the cedar (otherwise it may crack) before fastening 1” screws
Make the roof out of a cedar scrap, leaving a generous 1” overhang all around. Screw the roof into position and use paintable caulking to fill the countersunk heads. Also, caulk outside joints to prevent rain and air from entering the house. Bats require a warm, dry environment to thrive.
Leave the inside of your bat house unpainted. Apply several coats of dark coloured, water-based paint to the outside. (I used three coats of clear outdoor polyurethane on my house to allow the cedar’s beautiful figure to show through.)
The next step is to locate your bat house. It should be at least 15’ above ground in an area that is open to the east or south.
To raise the house, purchase three lengths of 1” ID galvanized iron pipe, threaded at either end. Join the pieces with couplings, adding a 90-degree elbow at the top. Screw a 3” nipple onto the open end of the elbow and then screw a 4” or larger floor flange onto the nipple. Secure the flange to the back of the house with ¾” x #12 non-rust screws; do not drive the sharp tips through the back of the structure.
To dig the 3’ to 4’ hole required to secure the pipe and house, invite some friends over to share a case of beer. Fill the hole with ¼” or ¾” down, packed tightly with a tamper.
Goodbye mosquitoes. Hello bug-free back yard.
davidsquare81@yahoo.com