

Parquet flooring enjoyed a revival from the mid-60s to mid-70s in Canada and the U.S. The most common type of flooring was a 12-inch square panel comprised of four smaller 6-by 6-inch tiles of red oak. Each small square consisted of seven flat pieces of hardwood, with their lengths aligned vertically and horizontally in a clockwise pattern, starting from the left top tile.
The four-part panels were held together with wire hydraulically pressed into a groove that ran along the underside of each of the four tiles. Tenons extended from one edge of each tile, allowing panels to interlock as they were laid in a bed of adhesive troweled on to a wood substrate, usually plywood.
Recently, I faced a problem of patching an L-shaped section of parquet flooring from which I had removed a living room wall. The home’s owner had some parquet panels apparently leftover from the original floor; however, they were inadequate because they had fallen apart, leaving me a pile of 6-inch-by-7/8-inch wide oak pieces to work with. I wasted several hours attempting to square the sides of the L-shaped hole with a router and a ½” straight bit. I then tried to recreate the parquet pattern with the oak sticks. The result was less than successful, to say the least.
My next plan was to purchase new parquet panels. I was delighted to find the same product and design available on Home Hardware’s website. At least, I was delighted until I learned the flooring was sold in American stores. As I only needed 2 ½ panels to do the patch job, I decided the hassle and expense of ordering from the U.S. were not worth it.
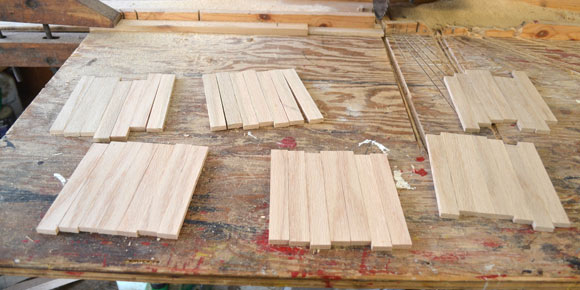
Plan two involved manufacturing my own panels from leftover red oak boards I had stored in my shop. I ripped the boards into 3/16-inch thick strips by 7/8-inch wide pieces and cross-cut them to just over 6-inches long. I made a squaring jig to align and glue seven of the oak strips at once, using a Jorgensen hand clamp to apply pressure while the yellow woodworker’s adhesive set. Finally, I trimmed each of my ten tiles on my table saw to ensure they were exactly 6-inches square.
Prying up the original 12-inch square panels was not difficult as the adhesive had dried out, losing its holding power. A couple of finishing nails had been driven through each tongue, easy to remove with a hammer’s claw. I scraped the old glue from the plywood substrate with a wide chisel.
With the panels removed, I filled in the space they left with my six-inch tiles, arranging them so the pattern matched the old ones. The fit was very snug; on a few tiles I had to pare the edges with a sharp knife to leave room for expansion in warm, moist months. Because I did not create my tiles with T&G edges, I glued each to the plywood substrate with Weldbond and applied pressure by placing weight lifting plates on top of them. I felt confident using this method as the patch is not in a high traffic area and will be partly covered by a bookcase when the reno is completed.
When the tiles are stained and finished with polyurethane, they will be indistinguishable from the rest of the parquet floor.
davidsquare81@yahoo.com