

As I write this column about how to build a child’s sleigh, there is some snow on the ground, but not a lot, after heat records were established in the month of November.
But that’s okay. The Farmers’ Almanac is forecasting a long, cold winter, so the odds are in our favour of more snowfalls at any time.
And that’s when you want to have your sleigh completed. How else are you going to convey your youngsters to the shopping mall or, if you don’t have small children, your small pet to the park for a brief romp in the white stuff with its buddies?
The sled I built combines design features from several traditional sleighs that originated in Europe and were brought to North America by settlers in the 19th century.
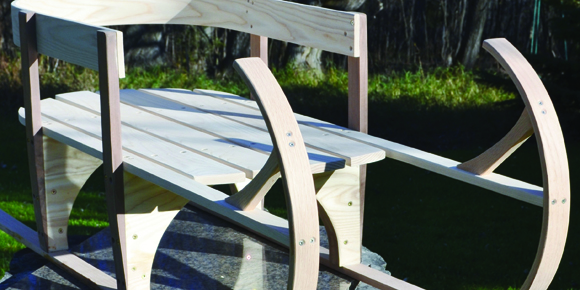
I recommend ash and/or red oak as the primary building materials because these woods have excellent steam bending classifications, a requisite for creating the prominent shepherd’s crook runners and the U-shaped back rest of this sleigh. (See picture).
Being cheap by nature and a firm believer in recycling by necessity, I got most of the ash for my sleigh from a leftover box of ash flooring I had saved from a previous project. Also, a good friend unwittingly donated a nine-foot length of clear red oak to my project because he left the wood in my shop for a year. (Shop rule No. 1 states that any material left behind for 365 days automatically becomes the property of the shop’s owner to do with as he wishes.)
Hint: If you know of people who are modernizing their older home by tearing out solid ash or oak baseboards and trims and replacing them with MDF, offer to haul the hardwood away free of charge. You may have to remove a few nails, but you will end up with a truckload of solid gold lumber that is mainly knot free.
To build the sleigh, you will require the following materials:
• One piece two-by-eight-inch by 36-inch weather resistant hardwood.
• About 30 linear feet of clear three-quarter-inch by three-inch wide ash or red oak.
Tools required:
• Jig saw, builder’s table saw, orbital or palm sander, No. 1 and No. 2 Robertson screwdrivers, epoxy glue, exterior urethane, countersink, 1 1/4-inch and 1 1/2-inch No. 6 and 1 1/2-inch No. 8 brass or stainless steel flathead Robertson screws, a lot of wood clamps.
Other stuff:
• Two bending jigs, electric kettle, four-inch diameter by eight-feet ABS pipe with cap, rope.
Begin by making the laminates for the two crook-shaped runners by ripping six pieces of quarter-inch-thick by 1 1/2-inch-wide ash or red oak from a 72-inch board. Each runner will consist of three laminates that are steam bent and epoxied together on a two-part bending form. As I have discussed steam bending in a previous article, I will not go into detail here, suffice to say an electric steam kettle and a length of ABS pipe will do the job (see February 6, 2015, REN).
If you are working alone, it is best to bend each laminate separately to ensure there are no gaps between them when you clamp them together with epoxy. I used a 16-inch OD circular piece of polymer water pipe as the inside form and a 16 3/4-inch outside form comprised of two three-quarter-inch plywood laminates. (see picture.)
Rip two quarter-inch by three-inch wide by 72-inch laminates from an ash board. Build a single part 15-inch half-circle bending form out of four layers of three-quarter-inch plywood. The form is used to bend the two laminates that comprise the back rest and sides of the sleigh. (See picture.) If you have a sufficient number of clamps, you can steam and bend this part of the sled while the glue cures for 24 hours on the runner form.
Make two 16-inch wide bridges out of two-by-eight-inch by 36-inch long material. (Any hardwood will suffice for these supports, though ash or oak will match the rest of the sled’s wood.) The bridges form the sleigh’s four legs to which the runners are screwed, as well as create joists to which the deck boards are attached. Use a jig saw to cut an arc out of each piece of lumber, leaving a margin of 1 1/2-inches wide on three sides. (See picture.)
Temporarily countersink and attach the runners to the bottom of each of the bridges’ legs with No. 8 by 1 1/2-inch Robertson screws, two per leg. Use a carpenter’s square to ensure the bridges are perpendicular to the runners.
Now lay your three-quarter-inch thick deck boards at right angles to the top edges of the bridges. The two outside deck boards are 1 1/2-inches wide by 42-inches long and extend from the inside curve of each fore runner, where they are attached by two No. 6 by 1 1/2-inch Robertson’s, to the back of the sleigh. Place the boards flush to the outside edges of each bridge and lightly attach them to the centre of each bridge with two countersunk No. 8 by 1 1/2-inch Robertson’s.
Using a half-inch wood spacer, position four three-quarter-inch by 2 7/8-inch by 32-inch deck boards so they are equidistant from each other and each board has a 10-inch overhang at the back as measured OC from the aft bridge. There should be a seven-inch overhang at the front as measured OC from the fore bridge. Lightly screw each board to the front and back bridges with countersunk No. 8 by 1 1/2 -inch Robertson’s.
Use the curvature of the laminated seat rest as a template to draw a matching curve on the overhanging deck boards at the back of the sleigh. Then create a less dramatic arc on the overhanging boards at the sleigh’s front by bending a flexible length of metal pipe into a gentle, pleasing curve, marking it with a light pencil line.
I did not permanently screw any deck boards into position as I found it was easier to remove the boards and jig saw out the curve on each one individually rather than attempt the job when they were permanently fastened to the sled. This approach also made it easier to sand off the kerf marks on the end grain left by the jig saw’s blade and to chamfer and sand all sides of each board.
Also required are four posts by three-quarter-inch by 1 1/2-inch by16-inches, which are screwed to the outside edges of the bridges to provide support for the curved back rest. I used black walnut for the posts because I had run out of ash and oak. I tapered the lower eight-inches of the posts so the bottom ends just rested on the outside edge of each runner. I left the top eight-inches of the posts full-size so the wood was sufficiently thick to receive three No. 6 by 1 1/4-inch Robertson’s that secure the back rest to the posts. Each post is epoxied and screwed in place using No. 8 by 1 1/2-inch Robertson’s driven into plugs glued into the end grain of the bridges.
Finally, fashion two curved support struts out of scraps of three-quarter-inch ash or oak. These members strengthen and add rigidity to the curved sections of the front of the runners and are secured in position by epoxy and four countersunk No. 6 by 1 1/4-inch Robertson’s. (see picture.)
Final word: The performance and longevity of the runners can be improved by screwing and epoxying strips of polyethylene to their undersides. The cheapest source of this polymer I could find was a $10 magic carpet that I sliced into long strips with a box cutter.