

Most of the balcony planter boxes available at retailers are constructed of plastic or flimsy strips of wood joined together with staples. Some are designed to hang precariously from a railing, while others are built to sit on a floor or rest on a coffee table at an inconvenient height.
Moreover, the planters are generally rectangular in shape, taking up more space than necessary to grow the shallow-rooted plants favoured by balcony botanists.
It’s easy for a DIYer to build a superior V-shaped planter using a handsaw, a bevel, a screwdriver and coated screws. The advantage of the shape is that it takes up less room and requires less earth to fill than a rectangular box, yet it has the same planting area.
Legs are added to raise the box to a comfortable working height — no more bending over to plant, water or view your sublime foliage.
The dimensions of the planter will depend on the size of your balcony and the number of flowers, herbs or small veggies you decide to grow. Solid three-quarter-inch cedar fence boards (the wood of choice for this project) are sold in 5 1/2-inch wide by six-foot lengths for about $4 each.
To get the most out of each piece, I designed a five-foot long planter, using one-foot cut-offs from the boards to form the tapered ends of the box, feet and battens. I used seven boards and about a half pound of 1 1/4-inch brown-coated deck screws to construct my planter.
Step 1: Starting with the sides, cut four boards to five feet. Each side consists of two boards joined by three 7 1/2-inch by three-quarter-inch battens. Before screwing the battens into position, align one end of each batten with a line drawn three-quarters of an inch from the bottom edge of each side piece. The three-quarter-inch space will allow the planter’s bottom to seat flush with the completed sides and ends of the box. Screw the battens to the interior of both sides, spacing them four-inches OC (on-centre) from the ends and OC in the middle.
Step 2: The tapered end pieces are 11-inches wide at the top, and joined together by a single OC batten attached in a similar manner to the side battens. The best way to cut the taper or mitre is to pre-join the 11-inch pieces and then draw a 30-degree bevel from the top corner of each end to the bottom. The cut out wedges should be 5 1/2-inches wide at the bottom.
Step 3: To assemble the box, screw the sides to the mitred end pieces, aligning the bottom edges of all pieces. The top edges of the ends will be about a quarter inch proud of the sides. If this detail bothers you, cut the edges flush with the sides.
Step 4: Cut the bottom board 1 1/2 inches shorter than the length of the side pieces to account for the thickness of the two three-quarter-inch ends. The bottom should drop into the 5 1/2-inch-wide space, sitting flush with the sides and ends as well as resting on the edges of the battens. A small gap between the bottom and the rest of the box is not a concern.
To hold the bottom in position temporarily, drive screws into the ends of a few battens and then secure the bottom by driving screws about every six-inches OC from the exterior of the sides and ends.
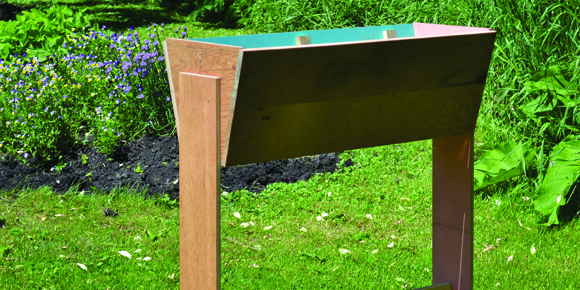
Step 5: Cut two 36-inch-long legs from a six-foot piece of cedar. Stagger screw the legs to each end of the box so that the edges are flush with the box’s top. This is an ideal working height for me, however, the height can be adjusted downward by shortening the legs or upward by leaving a gap between the top edge of the box and the top edge of each leg. (See prototype photo.)
Step 6: Measure the distance between the inside of the legs (should be same as box) and cut a piece of cedar the same length. Rip the board in half to obtain two lengths approximately 2 3/4 inches wide.
One piece is a trestle that is screwed to the inside of the legs about 10-inches OC from the floor and at the midpoint of each leg. Cut two 12-inch lengths from the other piece, screwing them at a right angle to the bottoms of the legs. The trestle stabilizes the diagonal movement of the planter and the legs prevent horizontal tipping. Place thick furniture felt pads at the end of each foot to prevent floor marring and to eliminate rocking. (For longer boxes, replace the trestle with two pieces of cedar in an X-shape to stabilize the planter by triangulation.)
Step 7: Drill several half-inch holes in the planter’s bottom for drainage and, for the same reason, add about three inches of gravel that is large enough not to fall through the holes. If you’re concerned about potting soil escaping from gaps in your planter, line the bottom about three-quarters of the way up the sides and ends with four-mil plastic. Do not forget to punch holes in the plastic to correspond with the drainage holes drilled in your planter’s bottom.
The types of plants you can grow in a balcony planter depend on the length and direction of the sunlight you receive each day. Greenhouse staffs are knowledgeable in this area and will suggest the best options available to you.
Old Irish saying: A green thumb is preferable to a purple toe.