

Creating a wood figurine with a band saw, angle grinder and drum sander is an alternative to using an array of chisels to carve a statuette. The advantage to grinding and sanding is the technique is fast compared to the traditional carving method, an important consideration for artists attempting to earn an income from woodworking.
When my wife and I were in the artistic woodworking business, we decided to add a line of walnut dolphin sculptures to our existing inventory of small jewelry boxes, earrings, lapel pins and earrings. The problem we faced was how to produce the wood dolphins without hand-carving each one, which is prohibitive because the time required would raise the retail price to a point where the dolphins were not saleable. (Consignment costs also had to be calculated. Art and craft shop contracts are usually 50/50 or, in some cases, 40/60 in favour of the artist.) With this in mind, we had to speed up production by replacing chisels with grinders.
Here is what we did:
1. My wife drew the profile of a dolphin on the face of a five-inch wide by eight-inch long by two-inch thick piece of black walnut. I then cut out the profile on the band saw and used it as a tracing template to create more statuettes.
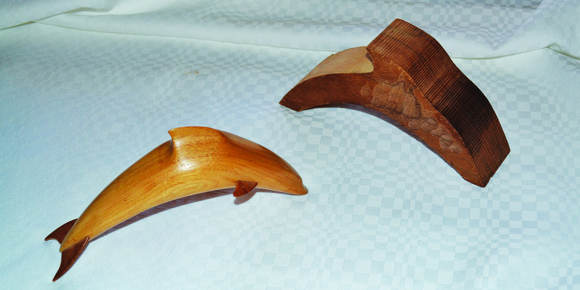
2. Starting from the dolphin’s nose, I rounded the sides of the body by removing excess wood on the band saw. I followed a pencil line eye-balled onto the body that left a three-quarter-inch wide nose, a 1 3/4-inch wide mid-body and a half-inch wide tail.
3. I realized the walnut was not thick enough for me to include flippers, fins and tail flukes. I considered laminating two pieces of walnut together, but this would have left an unsightly glue line on the finished product and doubled material costs. My solution was to add the appendages on to the completed body.
4. With the blank roughed out, I began to shape the body with an angle grinder with a 60-grit aluminum oxide disc. I used my vise as much as possible during this process as angle grinders produce a lot of torque and can be difficult to control. I also wore safety glasses to protect my eyes from wood chips and a dust mask to prevent fine wood dust from entering my lungs.
5. As I became more confident using the grinder, I could round out a body and create the centre or dorsal fin on top in about 20 minutes.
6. After the initial sculpting, I chucked a 2 3/4-inch pneumatic drum sander into the drill press and began the smoothing phase. Pneumatic drums are inflatable rubber devices for which cardboard collars covered with different grits of aluminum oxide or carbide are available. I started with an 80-grit collar, removing swirls and rough edges left by the grinder. (Low air pressure in a pneumatic drum allows it to conform to rounded shapes. Air can be added or released by a standard tire valve attached to the bottom of the drum.) I switched to a 120-grit collar for the final sanding.
7. To sculpt the distinctive long nose of the dolphin, I used a three-quarter-inch diameter solid core drum sander. I also used this sander to round out at a circular section forming the back of the dorsal fin.
8. I hand sanded the sculpture with 120-grit garnet paper to remove any machine sanding marks that I missed during the smoothing process and to round off any sharp corners.
9. My wife drew a tail fluke and a flipper on a two-inch-thick piece of walnut. I cut out the shapes on the band saw and then sliced the blocks like loaves of bread to produce several sets of flippers and flukes. These parts required a light sanding to remove the band saw’s kerf marks.
10. I attempted to attach the fins to the body with 1/16-inch dowels whittled from match sticks. These dowels were not strong enough to withstand rough handling, so I snipped finishing nails into short dowels. I drilled 1/16-inch holes in the fins and the sides of the dolphin and attached the appendages with the steel dowels, as well as fairly generous amounts of five-minute epoxy, scraping off excess adhesive before it set. The steel dowels solved the fragility problem.
11. My wife finished the dolphins with two coats of orange shellac, sanded between coats with 400-grit wet and dry sandpaper. The shellac was covered with two coats of rubbing varnish, also sanded between coats, and polished to a lustrous sheen with No. 0000 steel wool and carnauba wax.
12. We sold 20 dolphin sculptures for $60 each in a few weeks, which sounds like a lot of money until you subtract a 50 per cent consignment fee, our labour, the cost of our material, shop maintenance and machinery purchases and upkeep.
Being an artist is often compared to being an actor. There are a few who make the big time, while the rest eke out a living doing what, at least, they love.