

This column is a collection of tips concerning fences and gates that I have gleaned from experience or learned from talking to professional installers.
One tip is that bylaws in Winnipeg and some parts of Manitoba limit the height of front yard fences to four feet and backyard ones to six-feet, six-inches, unless a variance is approved. Check with your local building inspector before you build. Also, call before you dig to ensure that you will not rupture a water, gas or electrical line, as you could be responsible for damage or injury caused to people or property.
Another tip is that fence posts must be properly secured in the ground to avoid heaving due to our severe freeze/thaw cycles. Correct installation will also prevent tall, solid fences from being blown over during windstorms.
Fence installers suggest drilling a hole with a 10-inch or larger auger, depending on the size of the post, to a depth of four-feet, six -inches. The bottom of the hole is filled with six inches of gravel for drainage, followed by four feet of concrete or three-quarter-inch limestone down. The concrete should be worked with a trowel or other tool to ensure there are no voids in the mixture. Limestone down should be firmly tamped as the hole is filled, generally at each one foot level. Constantly check the level of the post as you tamp. Concrete is more forgiving in that you have time to level the post before the mixture sets.
Four-foot-high picket or similar fences with gaps that reduce wind shear generally do not require a 4 1/2-foot post hole. In this case, four-by-four-inch treated posts are buried to a depth of 2 1/2 feet, with the bottom filled with a half-foot of drainage gravel, followed by two feet of tamped three-quarter-inch or one-quarter-inch limestone down.
Concrete may be used in place of down, but at this shallower depth, it does tend to heave more readily than limestone, especially if the holes are dug by hand and become narrower as they progress downward.
Ideally, any post hole should be mushroomed out at the bottom to prevent water pressure and freeze-thaw cycles from forcing concrete or tamped down upward, skewing the post.
Some solid-vinyl fences are secured in place by eight-foot galvanized steel pipes pounded into the ground with a machine that can be rented by DIYers. Alternatively, the steel pipes can be installed by the company that sells the fencing. With this difficult part done, DIYers can build a vinyl backyard fence in a weekend, with time leftover to enjoy a cold beverage.
As a rule of thumb, six foot high by eight foot long white vinyl fence sells for about $37 per lineal foot uninstalled and $47 installed. Solid colours retail for $45 per lineal foot uninstalled and $55 installed; blends from $49 to $60.
I used to think that chain link fence was expensive and difficult to install. I overcame this prejudice recently when I helped a friend build a compound for his two dogs. He purchased a 100-foot roll of 72-inch chain link from Wallace and Wallace in Winnipeg for about $1,200, including two terminal posts, line posts and all the hardware.
The company will lend DIYers the requisite tools and equipment for stretching the fence and attaching hardware, according to Wallace and Wallace’s James Buhler. I recommend the fence puller/stretcher as it really helps to tighten the chain link once the posts are in the ground since a loose fence will sag. Also available is a post-pounder which eliminates the tedious job of drilling post holes with an auger and filling them with concrete of limestone down.
My friend and I spent most of our time laying out the post positions with a string line and a 100-foot surveyor’s tape. From that point, pounding the galvanized posts into the ground was a breeze with the appropriate tool. Adding top rails and other hardware was quick and easy, as was stretching the mesh with the fence puller.
My friend purchased an extra four terminal posts at about $30 each including cap. The additional posts were necessary to complete two corners of his 25-foot-square enclosure and to provide support posts either side of a gate custom built by Wallace and Wallace.
For people who cherish their privacy, opaque polymer pickets woven between the chain mesh can also be purchased at a reasonable price from the company.
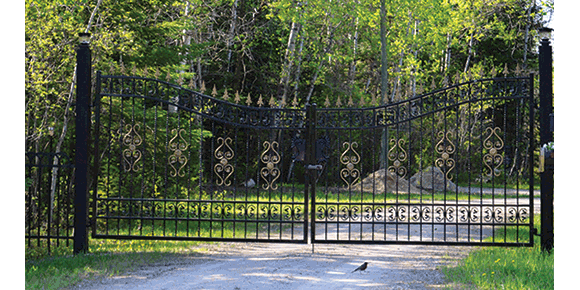
A final tip concerns driveway gates. I’ve always been enamoured of the majestic appeal that two-part aluminum, steel entrance or wood gates add to a home. However, my admiration was curbed when I looked into the cost of these monuments to vanity.
Depending on size, material and other amenities, a person is looking at about $24,000 for the gates only; add another $18,000 for installation, not including an automatic open/close option for $8,000. Your total expenditure would be $50,000 and could rise as high as $60,000, according to a spokesman for a Winnipeg driveway gate company.
The good news is that a single- or double-hung gate can be self-installed for a much lower cost by DIYers with the ability to work with concrete, brick/stone and the skill to install underground conduit for electrical lighting and for push button controls. My neighbour accomplished the task himself, spending about one-tenth of what a company would charge for a full installation.
Aside from saving a pile of cash by using his own construction skills, he bought his lovely black powder-coated double gates at an auction sale for a proverbial song. The accompanying picture is a testament to his abilities.