

The secret to making wood rings that will not crack in use is to laminate together hardwood turning blanks by alternating grains so that they are at right angles to each other. To create a blank which will yield six rings, I begin by laminating together one-inch squares of hardwood that vary in thickness from a maximum of a quarter-inch to a minimum of 1/32-inch, the thickness of a sheet of veneer. I stack the square pieces horizontally according to species on a scrap of three-quarter-inch plywood with a lip at the back on which I align the pieces. I brush yellow glue onto each piece as I work.
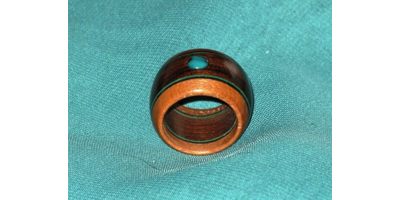
For a definite pattern, begin with a square of eighth-inch cherry, followed by a square of ebony veneer, then maple veneer and, to form the centre of the ring, a square of quarter-inch zebrawood. From this point, the assembly order is reversed. Each time a square is added, I change the grain direction to optimize strength and stability of the overall ring.
I include a quarter-inch square of scrap hardwood like birch between each ring as a spacer I can cut through when the time comes to separate the rings. I’ll also add a similar scrap at the start and end of each blank so that it can be mounted on a lathe without damaging the first and last rings.
Because of the relatively short open-time of yellow glue, I’ve found that a blank seven inches long is about all I can laminate. To ensure the glue-up goes smoothly, I have all my pieces stacked as to species and position in the blank before I begin. Also, I fill a small container with about two ounces of glue and keep it close by as the lamination progresses. An inexpensive half-inch-wide foam or bristle paint brush is adequate. I find it’s better to use more glue than not enough. A sheet of wax paper placed over the plywood work surface and back lip will prevent excess adhesive from sticking to unwanted areas.
To apply clamping pressure, I squeeze the blank lightly against the lip with a Jorgensen hand screw to make sure all the pieces are in alignment. Then I pull the laminates tightly together with a C-clamp attached to the top and bottom of the blank. Before mounting the blank, which should set for 24-hours, I take off the corners with a belt sander or angle grinder to prevent tear-out. I use a roughing-out gouge to form a cylinder, followed by a scraper to clean up any small tear-outs. Finally, I’ll use a V-parting tool to incise lines into the birch spacers where I will cut the cylinder into individual rings. I cut the blank in half on the band saw and drill an 11/16-inch hole with a sharp brad bit through one half, then the other. This keeps the bit on centre.
(Note: It is possible to turn the rings on the lathe, however, I have found that a little too much pressure with a finishing gouge can break the blank.)
When the holes are drilled through both halves of the cylinder, I cut the blanks into individual rings on the band saw using the incised V-tool lines as guides. From this point, I mount a ring-blank on a black walnut taper I turned on the lathe. The taper has a steel quarter-inch drill rod epoxied into the top so that it can be chucked into the drill press. I slide a ring onto the taper until it locks into position and then hold a cabinet scraper against the turning blank until I have removed excess material.
I start the finishing process with #80-grit paper (pieces of used or broken aluminum oxide sander belts work best), removing material until I have established a pleasing thickness for the ring. At the same time, I shape the outside of the ring so that it has a barrel shape or, for thinner pieces with a flat outside profile, the outside edges are rounded. I continue to sand the ring with #80, #120, #150 and finally #220 paper. I use a 5/8-inch sanding drum available to clean up the ring’s interior and, if necessary, to enlarge the diameter of the hole so the ring will fit almost any finger.
To put a beautiful, lustrous finish on my rings, I purchased a set of three buffing wheels from Lee Valley that are mounted on my lathe. Each linen/flannel wheel has its own buffing compound, starting with Tripoli, then white diamond and finally carnauba wax. The finish looks like sprayed lacquer and can be touched up from time to time by hand with a dab of carnauba wax and a flannel cloth.
Caveat: Wood rings should be removed before washing dishes, showering, swimming or any other activity that immerses them in water for a long time period.
My wife and I purchased some small turquoise cabochons, which we set in some of the rings that featured green/blue stripes of dyed veneer. Colours available are green tones as well as blue, red, gold, purple, white and black. We purchased the cabochons from a dependable Internet lapidary company we found on Etsy.
I enjoy making these rings because there is unlimited potential to be creative, and, for the most part, only small scraps of hardwood are required.